Monsters
There are many different creatures that reside in Middle-earth, all of them varying in size, strength, ferocity and even allegiance. Some of these creatures, such as the Great Eagles of The Misty Mountains, are noble beasts that trouble themselves little with the goings on of the world, whilst others are vicious and deadly creatures bred for war and to crush their enemies underfoot — monsters such as the fearsome Mûmakil used by the Haradrim at the Battle of Pelennor Fields. Even within the bowels of the deep places of the world, dark creatures of a bygone age stir, preparing to once more unleash their power upon Middle-earth.
The rules for Monster models are typically the same as those for other models in the game; because Monster models are so powerful, however, there are a few special rules that set them apart from most other fighters and creatures.
MONSTERS AND CAVALRY
Large, bulky beasts are immovable objects in the face of Cavalry charges.
Monster models are not affected by the Knock to the Ground bonus when being charged by a Cavalry model. However, Cavalry models will still get the Extra Attack bonus when charging a Monster that has the Infantry keyword and will still gain the bonus for charging with a lance if they are armed with one. A Monster that has a rider (such as a Fell Beast) is also a Cavalry model.
BRUTAL POWER ATTACKS
With mouths full of deadly teeth, claws like daggers and the power to tear a warrior in two, a monster is deadlier than almost any Man, Elf or Dwarf.
If a Monster wins a Fight, its controlling player may either resolve Strikes in the usual way, or may opt to use one of the following Brutal Power Attacks. Some Monster models may have other Brutal Power Attacks available to them — these will be listed on their profile. Note that as Brutal Power Attacks do not count as making Strikes, any special rule or Heroic Action that would affect a Monster model's Strikes (e.g., Heroic Strength, being Trapped, Special Strikes, Bane of Kings, Morgul blade, etc.) will not affect a Brutal Power Attack unless otherwise stated. Monster models that are Supporting (see page 84) cannot make Brutal Power Attacks.
A Monster may only ever use one Brutal Power Attack in a single turn.
In the rare situation where there are two or more Monster models on the same side in the same Fight, and both wish to use a Brutal Power Attack, the Monster model's controlling player nominates one Monster to use a Brutal Power Attack first. After this Brutal Power Attack has been resolved, other Monster models from the same fight may make a Brutal Power Attack so long as the opportunity still presents itself (see the rules for specific Brutal Power Attacks).
REND
Grabbing its foe in its powerful hands, claws or teeth, the monster attempts to rip its prey in half — rendering its normal defences all but useless.
Nominate one enemy model involved in the Fight, all of the Monster model's Attacks must be directed at the nominated model. When resolving a Rend against that model, compare the Monster model's Strength against the Strength of the nominated model, instead of its Defence.
REND
Thorin goes toe-to-toe with The Goblin King. Thorin loses the Fight, and The Goblin King decides to use the Rend Brutal Power Attack against him. The Goblin King will now compare his Strength of 5 against Thorin's Strength of 4 instead of his Defence of 7. Looking at the To Wound chart, these Strikes will wound on a 4+... Thorin is in serious trouble.
HURL
The monster picks up its foe and flings it backwards with incredible force, sending all in its path sprawling to the ground.
Before models Back Away, nominate a single enemy model involved in the Fight, and in base contact, with a Strength characteristic lower than that of the Monster and follow these steps:
-
Roll a D3 and add the difference in Strength between the Monster and the target — this is the Hurl distance.
-
Draw an imaginary line that runs through the centre of the Monster model's base and the centre of the base of the model that is being Hurled, going directly away from the Monster. This line is the direction of the Hurl.
-
Move the nominated model the full distance, in inches, equal to the Hurl distance, in a straight line — only stopping if it contacts a tree, wall or similar Obstacle or a model with Strength 6 or greater. At the end of this move, the model is placed Prone.
-
All models passed through (including Prone models and any underneath the model's final position) suffer one Strength 3 hit, Cavalry models suffer the hit on both the rider and the mount. If they survive, they are knocked Prone. If a model that is passed through is in combat, then every model Engaged in that combat (that is Strength 5 or less) is knocked Prone and suffers one Strength 3 hit.
-
The Hurled model suffers one Strength 3 hit for each model it passes through (including any underneath its final position), and one additional Strength 6 hit when its Hurled movement ends.
-
If the Hurled model hits an Obstacle, or a model that has a Strength of 6 or above, its move immediately ends. Both the Hurled model and the Obstacle or model it has hit (if it has a Defence value) suffers one Strength 6 hit. The nominated model, and any other model it has passed through, still suffers Strength 3 hits as described above. Move any models underneath the Hurled model's final position by the minimum distance that allows the Hurled model to be placed in its final position.
-
After a Hurl has been completed, the combat immediately ends, so no further Strikes or Brutal Power Attacks may be resolved.
HURL
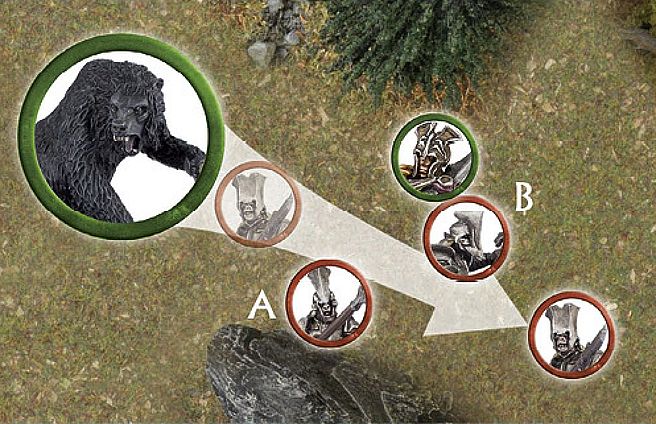
Beorn has won a Duel roll against a Gundabad Orc and decides to Hurl it. He rolls a dice and scores a 3, a D3 result of 2. Beorn is Strength 8 whilst the Gundabad Orc is Strength 4, a difference of 4, so the total Hurl distance is 6" (4 for the difference in Strength + 2 for the D3 roll). Beorn's controlling player draws an imaginary line that goes through the centre of both Beorn's and the Gundabad Orc's bases. The Orc is then Hurled along this line 6" directly away from Beorn, passing through two other Gundabad Orcs (A & B) on the way. The Hurled Orc suffers one Strength 6 hit for being Hurled and two Strength 3 hits for passing through two models. If it survives then it will be knocked Prone.
Gundabad Orc A suffers one Strength 3 hit and is knocked Prone. As Gundabad Orc B was in combat with a Mirkwood Elf Warrior, both models suffer one Strength 3 hit and will be knocked Prone if they survive.
BARGE
Using its considerable bulk, the monster forces those around it to stumble back from the fray, giving the monster the chance to advance once again.
All enemy models involved in the Fight (even supporting spear- or pike-armed models) must Back Away a full 3", instead of the usual 1", in an order and direction chosen by the Monster model's controlling player. Models may still Make Way for losers, in which case they are also moved 3" in a direction chosen by the Monster model's controlling player. If it is possible for the Monster model's controlling player to choose a direction in which they can move a model the full 3" then they must do so, any models that cannot Back Away or Make Way the full 3" are moved as far as possible and then placed Prone. After a Barge has been completed, the combat immediately ends so no further Strikes or Brutal Power Attacks may be resolved.
Once all the models have Backed Away, instead of making Strikes, the Monster now moves up to D6" in any direction, including making a further Charge if it wishes. If the Monster uses this move to Charge another model, it will fight again that phase (the player with Priority chooses when to fight this new combat).
A Monster cannot use the Barge Brutal Power Attack in the same turn that it also participates in a Heroic Combat — only one or the other may be used in a single turn.
WAR BEASTS
A War Beast is a special type of Monster that operates quite differently to the likes of Cave Trolls, Dragons and even Fell Beasts. A War Beast is intended to be ridden through the ranks of the foe, crushing them as they go.
Whilst a War Beast is classified as a Monster within our rules, there are a number of special exceptions which apply to how they move, fight and interact on the battlefield, which are all explained here.
A War Beast is comprised of the beast itself and its Commander. If the War Beast is also a Hero, then it is the Commander who is counted as being the Hero, not the beast itself. The Commander will count as the warband's leader, and the War Beast will not take up a slot in the warband.
A War Beast, and all the models riding it, will automatically pass all Courage tests for being Broken. When working out how a War Beast affects your Break Point, it will count as two models, for the Commander and the Beast. Unlike killing Cavalry models, you count as killing a model for each, plus any models that are riding it.
If a War Beast also has a Howdah, then certain models may be deployed within it as part of a War Beast model's warband. The number and type of models that may be deployed within a Howdah will be listed within each War Beast model's profile.
War Beast models may not use Brutal Power Attacks unless specified within their profile, and may never carry objects.
WAR BEASTS AND MOVEMENT
A War Beast cannot cross obstacles more than 2" tall, neither may they make Jump, Climb, Leap or Swim tests. They may not lie down or defend Barriers. A War Beast may enter difficult terrain, so long as the model will fit, but will halve their Move value whilst inside it. A War Beast will also move unimpeded through all kinds of water features.
Moving the Crew — Those within the Howdah can move within it, treating it as open ground, including moving up levels if it has them, but they cannot voluntarily dismount unless they have a rule that specifically allows them to. Crew members cannot lie down, and if knocked Prone must stand up as quickly as possible to avoid being jeered at by their comrades! Crew members that remain stationary within the Howdah do not count as moving, regardless of how far the War Beast itself has moved.
The Commander — Whilst the Commander is alive, any Heroic Moves or Marches that they declare will also affect the War Beast. If the Commander is slain, then another model within the Howdah will immediately take its place as the driver of the War Beast. Any model driving a War Beast may not make Shooting attacks.
Trample — When you wish to move a War Beast, pivot its base around the centre point to face the direction you wish to move it in. Whilst pivoting, the War Beast may come into contact with other models or terrain. In the case of models, move the other model out of the way via the shortest route available to allow the War Beast to finish its pivot. In the case of terrain, move the War Beast away just enough to allow it to finish its pivot. If a War Beast has already been charged then it cannot Trample or Stampede (see overleaf).
Once the War Beast has pivoted to face its desired direction, move it forwards the distance of its Movement value in a straight line, ignoring enemy models' Control Zones. Any models a War Beast comes into contact with whilst moving (not pivoting) will suffer the number of hits as stated in the War Beast model's profile. Cavalry models will suffer these hits on both the rider and the mount. If a contacted model is slain, the War Beast continues in its movement. If a contacted model is not slain, then the War Beast will stop and fight them in the Fight phase. Note that this does not count as Charging. A War Beast that is affected by a Heroic March may still Trample as normal.
If a War Beast comes into contact with a friendly model, it may choose to trample it, as described previously, or to stop its movement — in which case the friendly model will not suffer any hits. If the War Beast comes into contact with a fortification with a Defence of 9 or higher, or another War Beast, it will inflict three Strength 9 hits upon it as well as suffering three Strength 9 hits itself.
If an enemy model Charges a War Beast before it has moved, the War Beast will be pinned in place and be prevented from moving as normal.
WAR BEASTS AND MAGIC
Models with Magical Powers can use them on a War Beast, selecting either the War Beast itself or one of the crew members as the target. Magical Powers that affect multiple targets will automatically affect both the War Beast and its crew if in range of the model. Only by affecting the Driver will a Magical Power such as Transfix or Compel impede a War Beast model's movement (thereby causing it to remain stationary or take a move as described by the Magical Power). Finally, Magical Powers such as Sorcerous Blast, Nature's Wrath and Call Winds will not move the War Beast or knock it Prone, although they will still inflict any damage as detailed in the Magical Power's description.
If a model riding a War Beast is targeted by a Sorcerous Blast, it is damaged normally but not moved. Instead, the controlling player rolls a D6. On a 1-3, the model is knocked Prone in its position. On a 4+, the model is knocked down from the War Beast and suffers falling damage.
WAR BEASTS AND SHOOTING
Shooting at a War Beast — A War Beast can be shot at as normal, although note that due to the size of a War Beast, you do not need to make In The Way rolls for the Howdah when shooting at the War Beast. Models within the Howdah are considered to be separate models and so can be targeted independently by Magical Powers, shooting, etc. Siege Engine shots that target models within the Howdah, and roll the Slight Deviation result, are automatically allocated to the War Beast. The Howdah is always counted as being In The Way for any model riding a War Beast.
Shooting from a War Beast — Models within a Howdah are never considered to be part of a combat, and so may shoot normally during the Shoot phase. Crew members may make shooting attacks regardless of how far the War Beast has moved, providing that they themselves have not moved over half their Movement allowance or climbed up or down a level. A model that remained stationary within a Howdah does not count as moving for the purpose of moving and shooting.
WAR BEASTS AND COMBAT
Irresistible Force — If a War Beast ends a trample in base contact with an enemy model, and wins the ensuing combat, then all enemy models involved in the fight (including Monster models with a Strength equal to or lower than the War Beast) are knocked Prone.
Immovable Object — A War Beast cannot be knocked Prone for any reason, cannot be Hurled and never counts as Trapped. Additionally, a War Beast will never Back Away if it loses a fight — its opponents must Back Away instead. The only exception to this is if a War Beast is fighting another War Beast or another model with a similar rule (such as Smaug). In these cases, the smaller of the two War Beast models will Back Away. If both War Beast models are the same size, roll a D6. On a 1-3, the Evil player's War Beast will Back Away and on a 4+, the Good player's will.
WAR BEASTS AND DAMAGE
If a War Beast is wounded, there is a chance it will Stampede (see below) in the next turn. If a War Beast is slain, then all models riding it will suffer falling damage and, if they survive, will be placed Prone.
Stampede! — Every time a War Beast suffers a Wound, the model must take a Courage test using the Courage value of the model controlling it (if there is no model controlling the War Beast, use the creature's own Courage instead). Similarly, a Courage test must be taken at the start of each of the War Beast model's Moves in which it has no crew remaining. If the test is passed, nothing happens and the War Beast may act as normal. If the test is failed, however, then the opposing player may move the War Beast in its next Move phase exactly as if it were one of their models. If this takes a War Beast off the table then it, and all its crew, are removed as a casualty. In a turn in which a War Beast stampedes, models in the Howdah cannot make shooting attacks. At the end of a Move phase in which a War Beast stampedes, it will revert back to being under the control of its controlling player.