Narrative Scenarios
The Hobbit: An Unexpected Journey
ROAST MUTTON
PARTICIPANTS
Good: Thorin Oakenshield with the Oakenshield; Kíli the Dwarf; Fíli the Dwarf; Balin the Dwarf; Dwalin the Dwarf; Bifur the Dwarf; Bofur the Dwarf; Bombur the Dwarf; Ori the Dwarf; Nori the Dwarf; Dori the Dwarf; Óin the Dwarf; Glóin the Dwarf; Bilbo Baggins. Note: As they have not yet ventured into the Troll's hoard, Thorin and Bilbo do not carry Orcrist or Sting respectively. Bilbo also has not yet found The One Ring and therefore cannot use it.
Evil: Bill the Troll; Bert the Troll; Tom the Troll.
LAYOUT
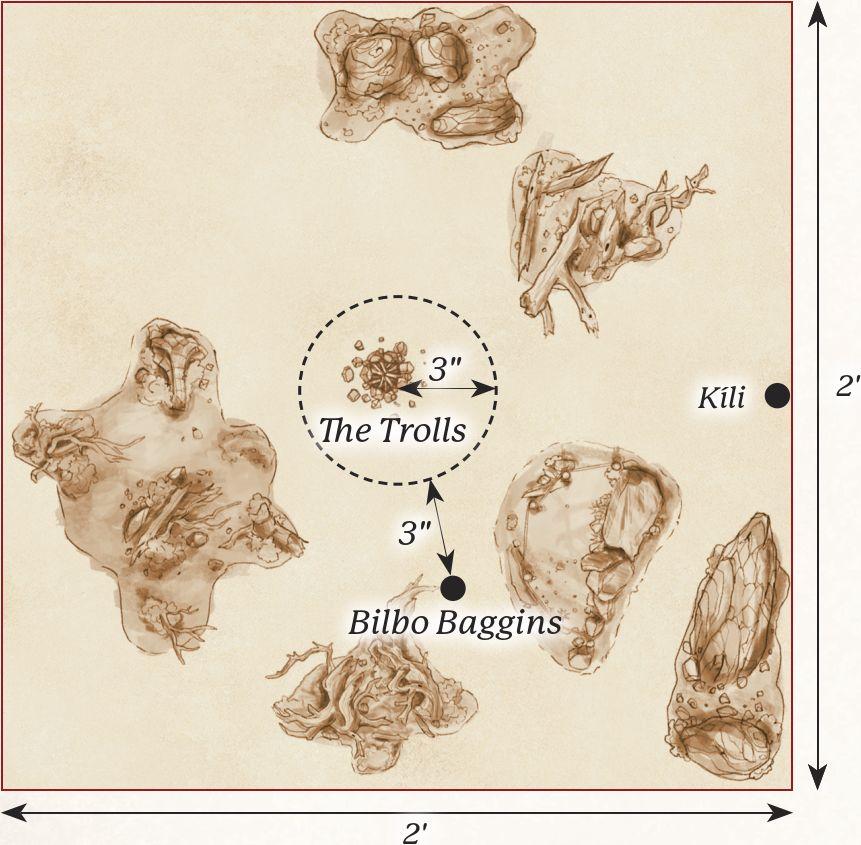
The Scenario takes place in an open clearing in the Trollshaws, where the Trolls have built their camp. The Campfire should be placed in the centre of the board, with the area immediately around it containing supplies and an enclosure with the captured ponies. The rest of the board should be a mixture of densely wooded terrain and rocky outcroppings.
STARTING POSITIONS
The Evil player deploys Bill, Bert and Tom within 3" of the Campfire. The Good player then deploys Bilbo within 3" of Bill and deploys Kíli touching the centre of the western board edge. The rest of Thorin's Company will arrive later.
OBJECTIVES
The Dwarves are attempting to save poor Bilbo from the clutches of the Trolls, whilst the Trolls are desperate for a decent meal.
The Good player wins if they can slay all of the Trolls before daybreak. The Evil player wins if all the members of Thorin's Company are slain or stuffed into sacks before the sun rises. The game is a draw if, when the sun comes up, all of Thorin's Company are not slain or in a sack, or if all of the Trolls are not slain. Additionally, if Bilbo is slain, the best result the Good player can achieve is a draw.
SPECIAL RULES
- "The dawn will take you all!"
At the end of the sixth turn, the sun will begin to rise. However, Gandalf will still need to destroy the rocky outcrop that is shrouding the clearing in darkness, if he is to save the company from being eaten.
At the start of turn seven, and each turn thereafter, roll a D6. On a 4+, Gandalf has broken the rocks surrounding the clearing, flooding the camp in sunlight and petrifying the Trolls.
- "I said drop him!"
At the end of the Good player's first Activation Phase, roll a D6 for each Thorin's Company model not on the board. On a 3+, they enter the board from the centre of the western board edge via the rules for Reinforcements. Any Dwarves that do not arrive at this time will instead enter from the centre of the western board edge at the end of the Good player's second Activation Phase.
- "A Burrahobbit?"
The Trolls may not make Strikes against Bilbo until the start of the third turn, or until Bilbo Charges one of them.
ESCAPE FROM GOBLIN-TOWN
PARTICIPANTS
Good: Thorin Oakenshield with Orcrist and the Oakenshield; Kíli the Dwarf; Fíli the Dwarf; Balin the Dwarf; Dwalin the Dwarf; Bifur the Dwarf; Bofur the Dwarf; Bombur the Dwarf; Ori the Dwarf; Nori the Dwarf; Dori the Dwarf; Óin the Dwarf; Glóin the Dwarf; Gandalf the Grey.
Evil: The Goblin King; Grinnah, Goblin Jailer; 30 Goblin Warriors.
LAYOUT
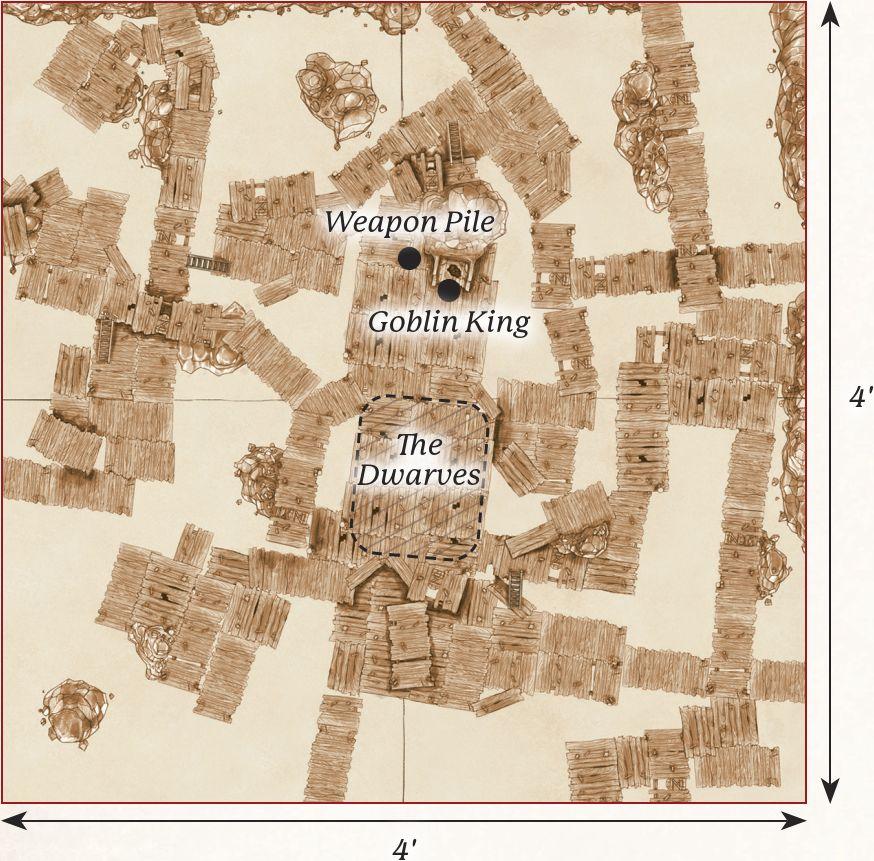
This Scenario takes place on a raised platform in front of the Goblin King's throne, which should be placed roughly in the centre of the battlefield. It is important that there are several ways to escape from the board, so ensure that there are walkways and platforms to enable the models to reach the edges. Then place a 25mm Weapon Marker to represent the pile of confiscated Dwarf weapons on the central platform (see map).
STARTING POSITIONS
The Good player deploys Thorin's Company, excluding Gandalf, who will arrive later, wholly within 3" of the centre of the board. The Evil player then deploys the Goblin King touching the Throne. Lastly, the Evil player may then deploy the rest of their models anywhere on the board that is at least 3" away from a member of Thorin's Company.
OBJECTIVES
The company of Thorin Oakenshield has found an opportunity to escape, but must be decisive if they are to outrun the Goblins. The Goblins must recapture the Dwarves, knowing that Azog will pay a pretty price for Thorin's head.
At the beginning of the game, the Evil player must nominate a board edge. This is the edge the Dwarves and Gandalf must escape from. The game lasts for 10 turns. The Good player wins if nine or more Good models have escaped from the nominated board edge. If eight Good models escape, the game is a draw. The Evil player wins if less than eight Good models escape.
SPECIAL RULES
- "Take Up Arms"
Each of the Dwarves will begin the game Unarmed. If any of the Dwarves Moves into base contact with the Weapon Marker at any point during their Activation, they will be able to recover the weapons listed in their Wargear.
- "A Wizard is Never Late"
At the end of the Good player's second Activation Phase, roll a D6 to see who chooses where Gandalf enters play. On a 1-3, the Evil player places Gandalf; on a 4-6, the Good player places him. Gandalf must be placed on a walkway, touching any board edge.
- "Kill Them All!"
At the end of each of the Evil player's Activation Phases, the Evil player may nominate D6 previously slain Goblin Warrior models. The nominated models may then Move onto the battlefield from any board edge via the rules for Reinforcements.
- Bottomless Pits
Any model that is pushed off of a platform or rocky outcrop, or who fails to jump from one platform to another, and if there is no platform or outcrop for them to land on, is automatically removed as a casualty.
- "I know that sword!"
In the first turn of the game, the Goblin King may not Move or declare Heroic Actions.
OUT OF THE FRYING PAN... AND INTO THE FIRE
PARTICIPANTS
Good: Thorin Oakenshield with Orcrist and the Oakenshield; Bilbo Baggins with The One Ring and Sting; Gwaihir; 4 Great Eagles.
Evil: Azog on the White Warg; Fimbul, Hunter Orc Captain on Fell Warg; 12 Hunter Orc Warg Riders; 12 Fell Wargs.
LAYOUT
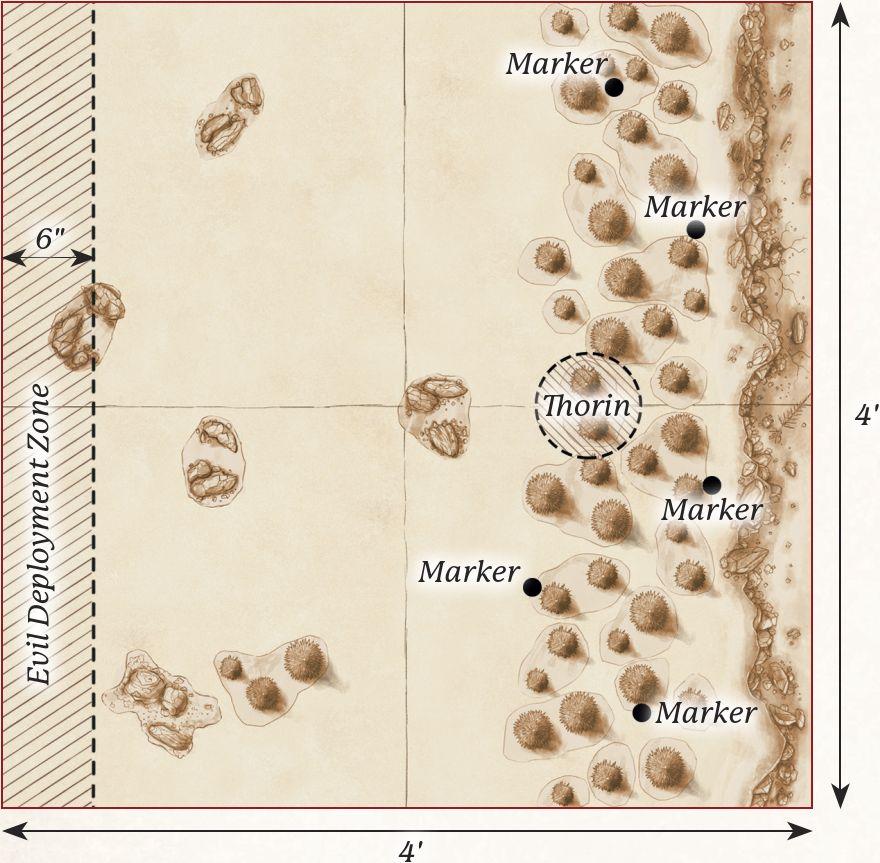
This Scenario takes place in and around the patch of woodland that the Dwarves are sheltering in from the Hunter Orcs. A cliff runs along the eastern board edge, with a stand of trees running along it. The rest of the battlefield should be dotted with rocky outcroppings and patches of brush.
STARTING POSITIONS
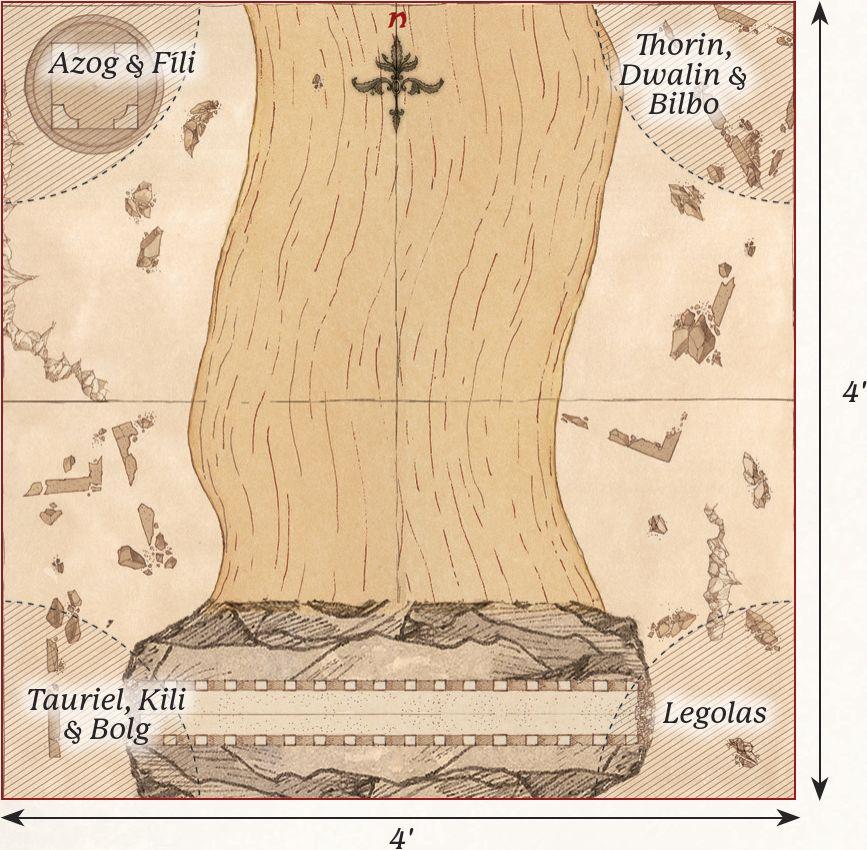
The Evil player deploys all of their models wholly within 6" of the western board edge. The Good player then deploys Thorin in base contact with the tree nearest to the centre of the western board edge (see map). All other Good models will be available later in the game.
OBJECTIVES
The Eagles must rescue the company and speed them on their way towards the Lonely Mountain. Azog is here for one reason: to take Thorin's head.
The game lasts until all of the Dwarf Markers, Thorin and Bilbo are no longer on the board. The Good player wins if the Eagles safely carry all the Dwarf Markers, Thorin and Bilbo off any board edge. The Evil player wins if they can prevent this from happening.
SPECIAL RULES
- Rescuing the Dwarves
Before the game starts, each player takes it in turn to nominate a total of five trees, starting with the Good player. These are the trees where the Dwarves and Bilbo are hiding; place a Dwarf Marker beside each tree to remind you. At the end of each Good Activation Phase, any Eagle model not Engaged in Combat may pick up a Dwarf Marker it is in base contact with as if it were a Light Object. Thorin and Bilbo may be carried in the same way. If an Eagle model leaves the board whilst carrying a Dwarf Marker, Thorin or Bilbo, then they are considered rescued.
- Friends on Swift-wings
The Eagles enter the board from the northern or southern board edge at the end of the Good player's second Activation Phase via the rules for Reinforcements. Any Great Eagle that leaves the board carrying a Dwarf Marker, Thorin or Bilbo, or that was previously slain, may re-enter the board at the end of the Good player's next Activation Phase from either the northern or southern board edge via the rules for Reinforcements. If an Eagle model is carrying a Dwarf Marker, Thorin or Bilbo, it may not use Brutal Power Attacks. If an Eagle model is slain whilst carrying a Dwarf Marker, Thorin or Bilbo, then they are lost and are considered to be slain.
- Thorin's Wrath
When Thorin Moves, he must always Charge an enemy model if possible; prioritising Azog if able. If when Thorin Moves he cannot Charge an enemy model, then he must Move as close as possible to Azog. Additionally, until Thorin suffers a Wound, he gains the Fearless special rule.
- Bilbo
At the start of any Fight Phase, the Good player may place Bilbo in base contact with any model Engaged in Combat with Thorin. If Bilbo enters the battlefield in this way, he must also be rescued by the Eagles (otherwise he counts as having been rescued along with one of the other Dwarf Markers).
The Hobbit: The Desolation Of Smaug
FLIES AND SPIDERS PART 1: THE UNSEEN HERO
PARTICIPANTS
Good: Bilbo Baggins with The One Ring and Sting.
Evil: 6 Mirkwood Giant Spiders.
LAYOUT
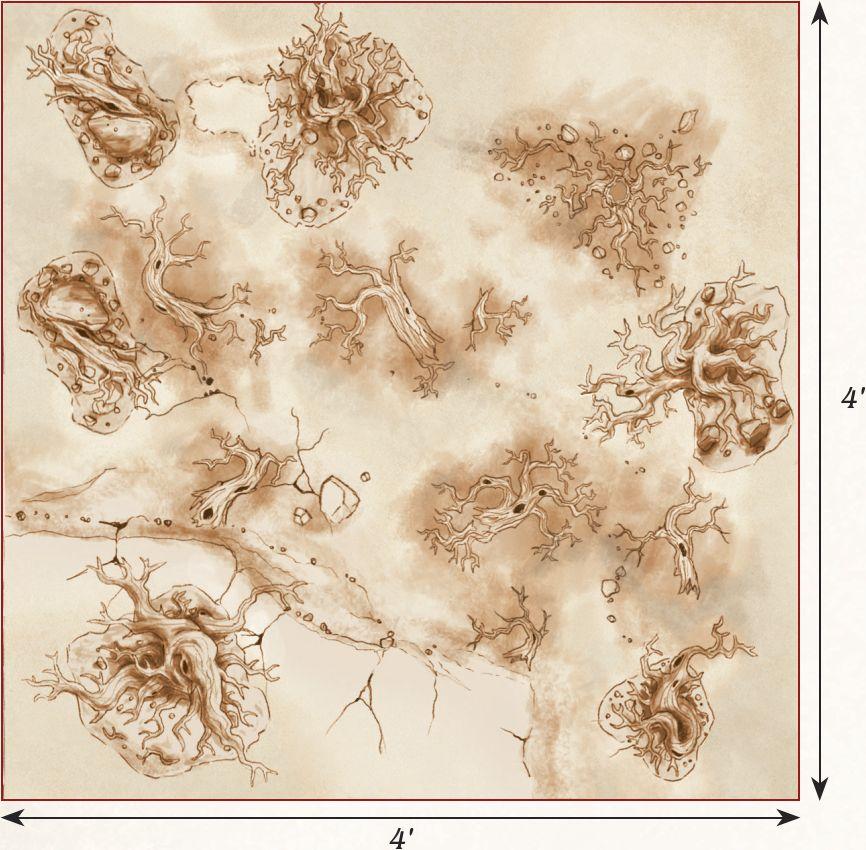
This Scenario takes place in the spider-infested forest of Mirkwood. The board should be densely populated with trees, bushes and rocky ground, creating a complex network of terrain for Bilbo to navigate.
STARTING POSITIONS
The Evil player places three 25mm Markers on the board at least 6" apart. Two of these Markers represent the captured Dwarves, the other is a decoy (the Evil player chooses these in secret). These may be placed in Difficult Terrain - even in trees if you agree that Bilbo may climb them. The Evil player then positions their Mirkwood Giant Spiders at least 6" away from one another. Finally, the Good player places Bilbo Baggins touching any board edge. Bilbo starts the game wearing The One Ring.
OBJECTIVES
Bilbo must rescue the Dwarves if they are to continue their quest to reclaim Erebor. The Spiders must protect their hard earned meal.
The game will last until the end of a turn in which one player completes their objective. The Good player wins if Bilbo is able to free all of the Dwarves by revealing both of the correct markers, or by killing all of the Spiders. The Evil player wins if they are able to kill Bilbo before he can do this.
SPECIAL RULES
- Brave Master Baggins
In a turn in which Bilbo Charges, he receives +1 Fight Value and +1 Attack until the End Phase of the turn. Additionally, Bilbo's Thrown Stones become a throwing weapon with a Strength of 1, instead of following the normal rules for Thrown Stones.
- The Power of the Ring
Each turn, at the start of each Mirkwood Giant Spider's Activation it must take an Intelligence Test. If the test is passed, the Evil player may Move that Mirkwood Giant Spider D6". If the test is failed, the Good player may move that Mirkwood Giant Spider D6" instead.
Spiders may not be Moved off the battlefield and must always Move the full amount rolled, stopping only if they move into base contact with Bilbo. If a Spider does Move into base contact with Bilbo, it will count as having Charged him. Once Bilbo has been Charged by a Mirkwood Giant Spider, any other Mirkwood Giant Spiders yet to move will automatically pass their Intelligence Test for that turn.
- Caught in a Web
If Bilbo is touching a Marker in the End Phase, the Good player rolls a D6. On a 3+, the Evil player must remove the Marker and reveal if it contained any Dwarves.
FLIES AND SPIDERS PART 2: THE ELVES OF MIRKWOOD
PARTICIPANTS
Good: Thorin Oakenshield with Orcrist; Kíli the Dwarf; Fíli the Dwarf; Balin the Dwarf; Dwalin the Dwarf; Bifur the Dwarf; Bofur the Dwarf; Bombur the Dwarf; Ori the Dwarf; Nori the Dwarf; Dori the Dwarf; Óin the Dwarf; Glóin the Dwarf; Legolas Greenleaf, Prince of Mirkwood with Elven cloak; Tauriel, Ranger of Mirkwood with Elf bow; 10 Mirkwood Rangers.
Evil: 10 Mirkwood Giant Spiders.
LAYOUT
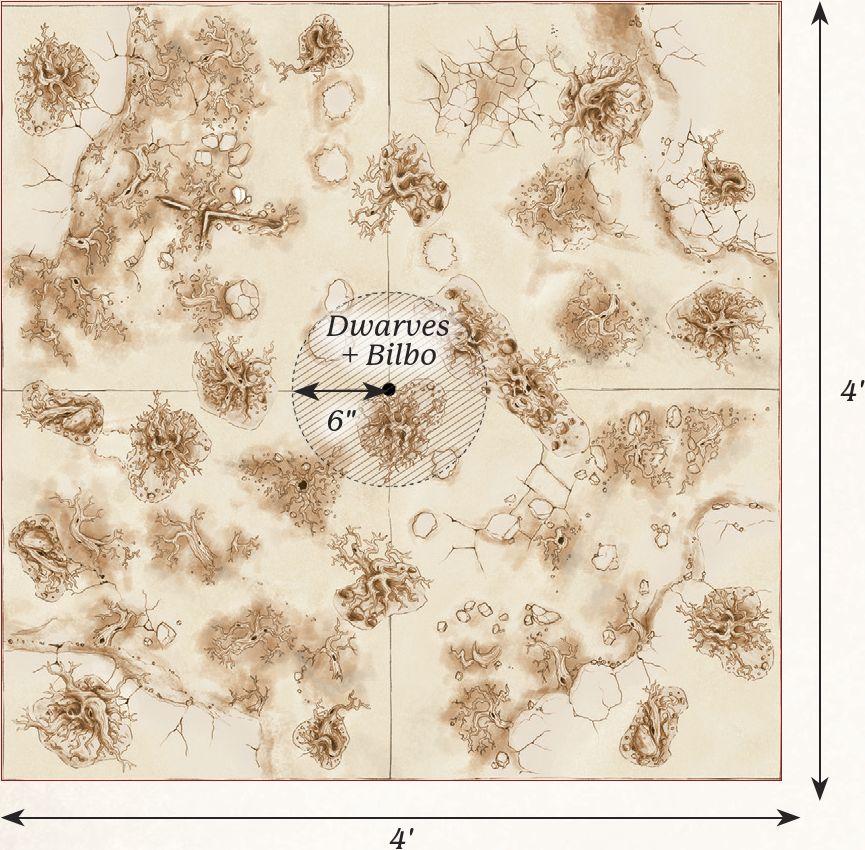
This Scenario takes place on the overgrown forest floor of Mirkwood. Much like Flies and Spiders Part 1, you'll want the board to be liberally covered in rotting trees and thick tangles of undergrowth.
STARTING POSITIONS
The Good player positions Thorin's Company within 6" of the centre of the board. The Evil player then deploys all of the Spiders anywhere on the board that is at least 10" away from any Good model. The Elves are kept aside and will arrive later.
OBJECTIVES
The Dwarves are fighting to survive against the ferocious horde of Spiders. The Spiders are simply looking for a substantial meal, which the Dwarves are more than suitable for!
The game lasts for 12 turns. If at the end of 12 turns there are still 10 or more members of Thorin's Company left alive, the Good player wins. The Evil player wins if they can slay at least six members of the company. Any other result is a draw.
SPECIAL RULES
- Haze of Mirkwood
At the start of each Dwarf model's Activation, roll a D6. On a 4+, they may Activate as normal. On a 1-3, they may not Activate that turn, may only roll a single dice for a Duel Roll and cannot make Strikes.
- The Rangers
At the end of the Good player's fourth Move Phase, they may move Legolas, Tauriel and the Mirkwood Rangers onto the board as Reinforcements from any board edge.
- The Spider's Nest
Any Mirkwood Giant Spiders that are slain should be put to one side. At the start of each Priority Phase, before Priority is rolled, the Evil player may place any previously slain Mirkwood Giant Spiders onto the board at least 10" away from any Good models. These Spiders may act as normal.
LAKE-TOWN ESCAPE
PARTICIPANTS
Good: Legolas Greenleaf, Prince of Mirkwood with Orcrist.
Evil: Bolg, Spawn of Azog; Fimbul, Hunter Orc Captain; 24 Hunter Orc Warriors: 6 with Orc bow, 6 with two-handed weapon, 12 with no additional wargear.
LAYOUT
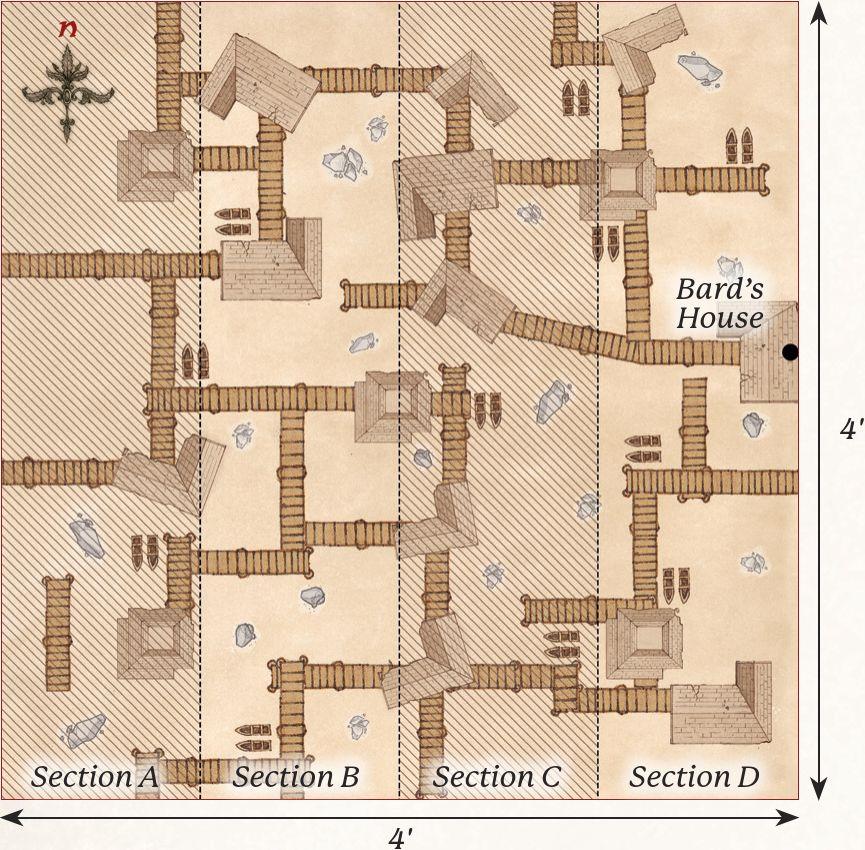
This Scenario takes place within Lake-town. The board should be covered with plenty of walkways, platforms and buildings to make up the dense and winding town on top of the Long Lake. One building that is touching the eastern board edge needs to be designated at Bard's House. The areas not covered by these walkways and such represent the Long Lake, and should be treated as Deep Water. You may also place a number of boats and ice floes for models to jump across should you wish.
STARTING POSITIONS
The board is divided into four distinct sections labeled A, B, C and D, running from north to south, each 12" wide. The Evil player then splits their Hunter Orc Warriors into four groups of 6, and deploys each group in a different section of the board as shown on the map, though not within 3" of another section. Those deployed in section D must deploy wholly within 3" of Bard's House. Bolg is deployed with the group in section A, whilst Fimbul is deployed with the group in section C. The Good player then deploys Legolas anywhere in base contact with Bard's House.
OBJECTIVES
Following their attack on the Dwarves in Bard's house, the Orcs have realised that Thorin is not present, and so are falling back to inform their masters. Legolas is determined to wipe out the Orcs who have invaded Lake-town.
The game will last until the end of a turn in which one player completes their objective. The Good player wins if every Evil model has been slain. The Evil player wins if either Bolg escapes the board via the western board edge and is not seriously injured (see special rules), or if Legolas is slain.
SPECIAL RULES
- Silent Assassins
At the start of the game, only the Orcs in section D may act as normal. All other Evil models act as Sentries, though they may not Move out of their section until they are aware of Legolas.
The alarm is not raised as normal in this Scenario. Instead, if an Evil model from a section that may act as normal Moves into base contact with an Evil model that is currently acting as a Sentry, then the alarm is immediately raised in that section - though not in any others that are still Sentries. Additionally, if Legolas Charges or Shoots at a model acting as a Sentry, and the model has not been removed as a casualty by the End Phase of the turn, then the alarm is raised in that section as described above.
- Legolas' Fury
In this Scenario Legolas increases his Attacks to 3 and his Fight Value to 7.
- The Spawn of Azog
Bolg has 3 Fate Points in this Scenario. Additionally, whilst he has all of his Wounds remaining Bolg may not leave the board and when he Activates Bolg must always Charge Legolas if possible (unless he is still acting as a Sentry, of course). However, if Bolg is ever reduced to a single Wound then he is considered to be seriously injured. If Bolg escapes the board whilst he is seriously injured then the best result the Evil player can achieve is a draw.
The Hobbit: The Battle Of The Five Armies
FIRE AND WATER
PARTICIPANTS
Good: Bard the Bowman; Bard's Family; Tauriel, Ranger of Mirkwood with Elf bow; Kíli the Dwarf; Fíli the Dwarf; Bofur the Dwarf; Óin the Dwarf; The Master of Lake-town; Alfrid the Councillor; Braga, Captain of the Guard; 24 Lake-town Guard: 8 with spear, 8 with bow, 8 with no additional equipment.
Evil: Smaug.
LAYOUT
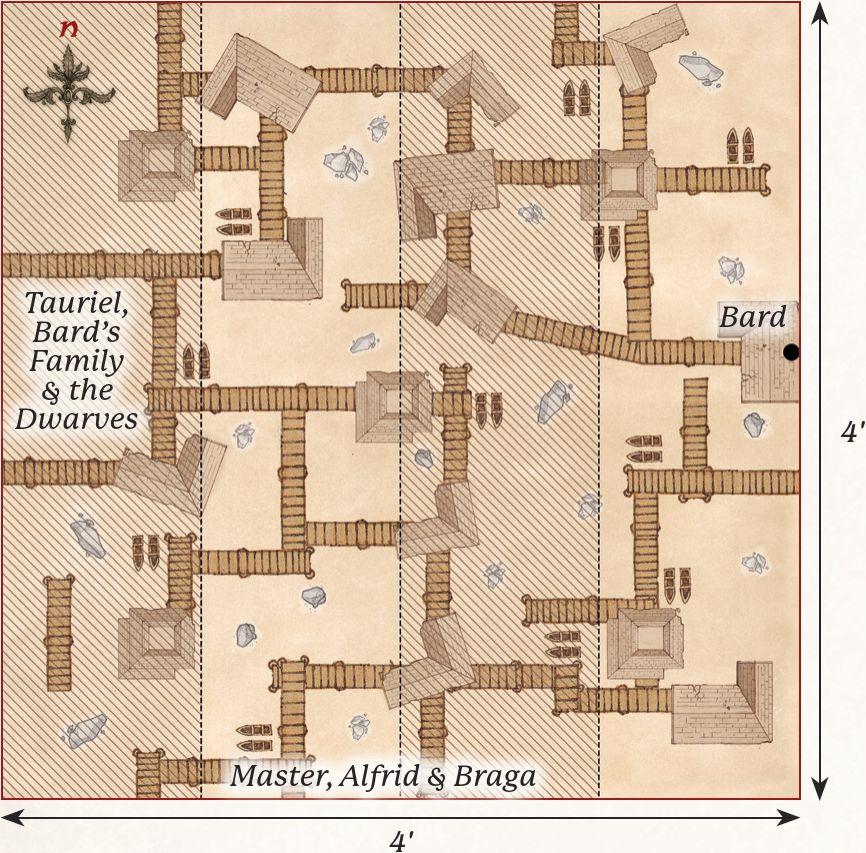
The Scenario is played across the wooden jetties and walkways of Esgaroth. There should be five towers on the board; one in the centre, with the other five arranged as shown on the map. Plenty of other buildings should be dotted around Lake-town, providing lots of hiding places from Smaug's flames.
STARTING POSITIONS
The Good player deploys Bard touching the eastern board edge. They then deploy Bain, Sigrid, Tilda, Tauriel, Kíli, Fíli, Bofur and Óin touching the western board edge. The Master of Lake-town, Alfrid and Braga are deployed touching the southern board edge. The Lake-town Guard are deployed anywhere on the board.
OBJECTIVES
Smaug has come to wreak death and destruction on the fishing settlement of Lake-town, and will not rest until it is naught but ash. The only way to stop the mighty beast is to slay him.
The game lasts until one side has wiped out the opposing force, at which point they are declared the winner.
SPECIAL RULES
- Smaug's Descent
At the end of the Evil player's first Activation Phase, Smaug may Move onto the board at any point on the northern board edge via the rules for Reinforcements.
- The Black Arrow
Bain starts the game in possession of the Black Arrow, which is a Light Object. If both Bard and a model carrying the Black Arrow are in the same tower, Bard may fire the Black Arrow as if he was firing the Windlance, and will still benefit from the Black Arrow special rule. Bard may still fire the Black Arrow even if he has Moved this turn.
- A Dragon's Wrath
Good Hero models gain the Stalk Unseen special rule. However, any Hero model in one of the towers will lose this special rule whilst they remain in one of the towers.
- Bard's Destiny
Bard gains the Mighty Hero special rule. Additionally, Bard may ignore the rule where if one of his family is slain then he must Charge the model that killed them if possible - he is already trying to slay the Dragon after all!
- The Waters of the Long Lake
The water is always Deep Water. Additionally, any model that has been Set Ablaze that enters the water for any reason will no longer be Set Ablaze.
ASSAULT ON RAVENHILL
PARTICIPANTS
Good: Thorin Oakenshield, King Under the Mountain; Dwalin the Dwarf, Champion of Erebor; Kíli the Dwarf, Champion of Erebor; Fíli the Dwarf, Champion of Erebor; Bilbo Baggins, Master Burglar; Tauriel, Ranger of Mirkwood; Legolas Greenleaf, Prince of Mirkwood with Orcrist.
Evil: Azog the Defiler with heavy armour and Stone Flail; Bolg, Spawn of Azog; 12 Gundabad Berserkers; 6 Gundabad Orc Warriors: 3 with shield and 3 with spear.
LAYOUT
This Scenario takes place atop the summit of Ravenhill. Ruins lie to either side of the frozen river that runs down the centre of the board. At the southern edge of the board, the river should be crossable via a collapsed tower that now acts as a bridge between the two banks.
STARTING POSITIONS
The Good player deploys Thorin, Dwalin and Bilbo within 12" of the north-east corner of the board. The Evil player then deploys the Gundabad Berserkers within 18" of the north-east corner of the board and at least 6" away from any Good model. Kíli and Tauriel are then deployed within 12" of the south-west corner of the board. The Evil player then deploys Bolg within 5" of Kíli. Legolas is then deployed within 12" of the south-east corner of the board. The Evil player then deploys Azog and the Gundabad Orcs within 12" of the north-west corner of the board, the Good player then deploys Fíli within 1" of Azog.
OBJECTIVES
This is a fight to the bitter end. Thorin and his allies know that the death of Azog and Bolg will likely lead to victory for the armies battling in the valley below. The Pale Orc and his spawn know that if the line of Durin ends here, he and his forces can press on to the Lonely Mountain and claim it for their lord.
Whichever side wipes out their opponent first is declared the winner, and shall decide the fate of the Lonely Mountain.
SPECIAL RULES
- The Trap is Sprung
The Evil player has Priority on the first turn.
- The Last Stand
Hero models may not declare Heroic Strikes.
- Orcrist
At the start of any Fight Phase, before the Declare Heroic Actions Step, if Legolas is within 6" of Thorin, and Thorin is Engaged in Combat with an enemy Hero model, then Legolas can throw Orcrist to Thorin. From that point on, Thorin carries Orcrist instead of Legolas.
- Treacherous Ice
Any model that Moves on the frozen river during their Activation, and ends its Move on the river, must roll a D6. On a 1, the model loses its footing and is immediately Knocked to the Ground.
- The Price of Grief
If Tauriel is slain, Legolas immediately increases his Fight Value to 7 and his Attacks to 3.
THE BATTLE OF THE FIVE ARMIES
PARTICIPANTS
Good:
Erebor Reclaimed: Thorin Oakenshield, King Under the Mountain; Kíli the Dwarf, Champion of Erebor; Fíli the Dwarf, Champion of Erebor; Balin the Dwarf, Champion of Erebor; Dwalin the Dwarf, Champion of Erebor; Bifur the Dwarf, Champion of Erebor; Bofur the Dwarf, Champion of Erebor; Bombur the Dwarf, Champion of Erebor; Ori the Dwarf, Champion of Erebor; Nori the Dwarf, Champion of Erebor; Dori the Dwarf, Champion of Erebor; Óin the Dwarf, Champion of Erebor; Glóin the Dwarf, Champion of Erebor.
The Iron Hills: Dáin Ironfoot, Lord of the Iron Hills on War Boar; 1 Iron Hills Captain; 1 Iron Hills Captain with Mattock; 36 Iron Hills Warriors: 12 with shield & spear, 12 with Mattock, 12 with crossbow; 1 Iron Hills Chariot.
Halls of Thranduil: Thranduil, King of the Woodland Realm on Great Elk; 1 Mirkwood Elf Captain; 36 Mirkwood Elf Warriors, 12 with shield, 12 with Elven Glaive, 12 with Elf bow.
Radagast's Alliance: Beorn; Radagast the Brown on Great Eagle; Gwaihir; 4 Great Eagles.
Evil:
Azog's Legion: Azog the Defiler with heavy armour and Stone Flail; Bolg, Spawn of Azog; 5 Gundabad Orc Captains; 2 Goblin Mercenary Captains; 60 Gundabad Orc Warriors: 30 with shield, 30 with spear; 2 Gundabad Trolls with crushing club; 2 Gundabad Trolls with Scythe Gauntlets; 1 Troll Brute; 6 Gundabad Ogres; 24 Gundabad Berserkers (up to 12 may have a two-handed weapon); 24 Goblin Mercenaries; 6 War Bats; 1 Gundabad Catapult Troll.
LAYOUT
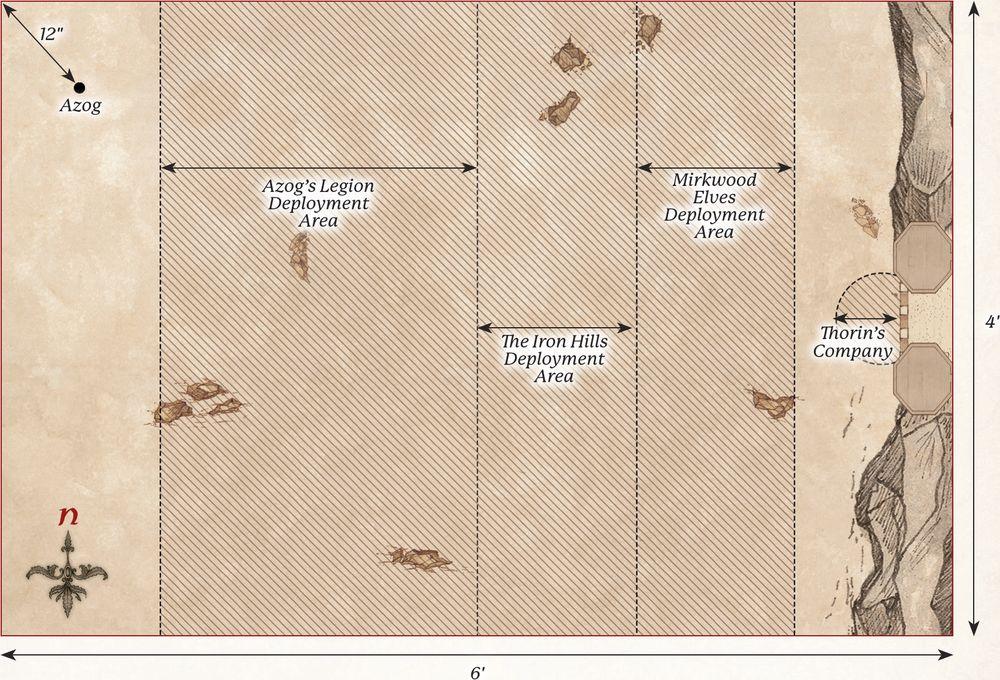
The board represents the plains before Erebor - there should be a few scattered rocks and scrubland dotted around (not too much as there are a lot of models in this Scenario!). The eastern board edge represents the walls of Erebor, the centre of which marks the gates of Erebor.
STARTING POSITIONS
The Evil player deploys Azog within 12" of the northwestern corner of the board. They then deploy the Gundabad Orc Captains, Gundabad Orcs, Gundabad Trolls, Ogres and Catapult Troll between 12" and 36" of the western board edge. The Good player then deploys Dáin and the Iron Hills Dwarves in the eastern half of the board within 12" of the centre of the board. They then deploy Thranduil and the Mirkwood Elves between 12" and 24" of the eastern board edge. Finally, the Good player deploys the members of Thorin's Company within 6" of the gates of Erebor. All other models are kept to one side.
OBJECTIVES
The game lasts until one force has been reduced to 25% of its starting numbers. There are five main objectives that both sides are trying to achieve. Whichever side achieves the most objectives is the winner:
- Azog: If Azog has been slain at the end of the battle, the Good player achieves this objective. If Azog is alive at the end of the battle, the Evil player achieves this objective.
- Thorin: If Thorin has been slain at the end of the battle, the Evil player achieves this objective. If Thorin is alive at the end of the battle, the Good player achieves this objective.
- Thranduil: If Thranduil moves off the western board edge to reach Dale, the Good player achieves this objective. If not, the Evil player achieves this objective.
- The Battlefield: At the end of the game, whichever Army has the most models within 6" of the centre of the board achieves this objective.
- Strength of Numbers: Whichever Army reduces their opponent to 25% of their starting number first achieves this objective.
SPECIAL RULES
- Forth from Gundabad
At the end of the Evil player's fifth Activation Phase, the Evil player moves Bolg, the Gundabad Berserkers, the Goblin Mercenaries and the War Bats onto the board from any point on the northern board edge that is within 36" of the western board edge via the rules for Reinforcements.
- "The Eagles are Coming!"
At the end of the Good player's seventh Activation Phase, the Good player moves Radagast, Gwaihir and the Great Eagles onto the board from any point on the northern board edge via the rules for Reinforcements.
- Beorn
Beorn enters the board as a passenger on the back of any of the Great Eagles (not Gwaihir or the one carrying Radagast) and follows the normal rules for Passengers, with the exception that Beorn may both Move and Charge on the turn he dismounts.
Beorn may not transform into a bear whilst mounted upon this eagle, but will automatically transform as soon as he dismounts.
- Bofur, the Troll Rider
If Bofur is Engaged in Combat with the Troll Brute and the Good player wins the Combat, then the Good player may choose for Bofur to take control of the Troll Brute. Remove Bofur from play (note, he does not count as a casualty). From this point on, the Troll Brute is treated as a Good model and is controlled by the Good player with Bofur as its commander.
- The Signal Tower
In this Scenario, the Evil force benefits from the Raise the Banners special rule as presented in the Army of Gundabad Army List. This can be found on page 147 of Armies of The Hobbit.
The Lord Of The Rings: The Fellowship Of The Ring
WEATHERTOP
PARTICIPANTS
Good: Frodo Baggins; Samwise Gamgee; Meriadoc Brandybuck; Peregrin Took; Aragorn (Strider) with bow.
Evil: The Witch-king of Angmar (1 Attack, 1 Might, 10 Will, 1 Fate) with Morgul Blade; 4 Ringwraiths (1 Attack, 0 Might, 7 Will, 0 Fate).
LAYOUT
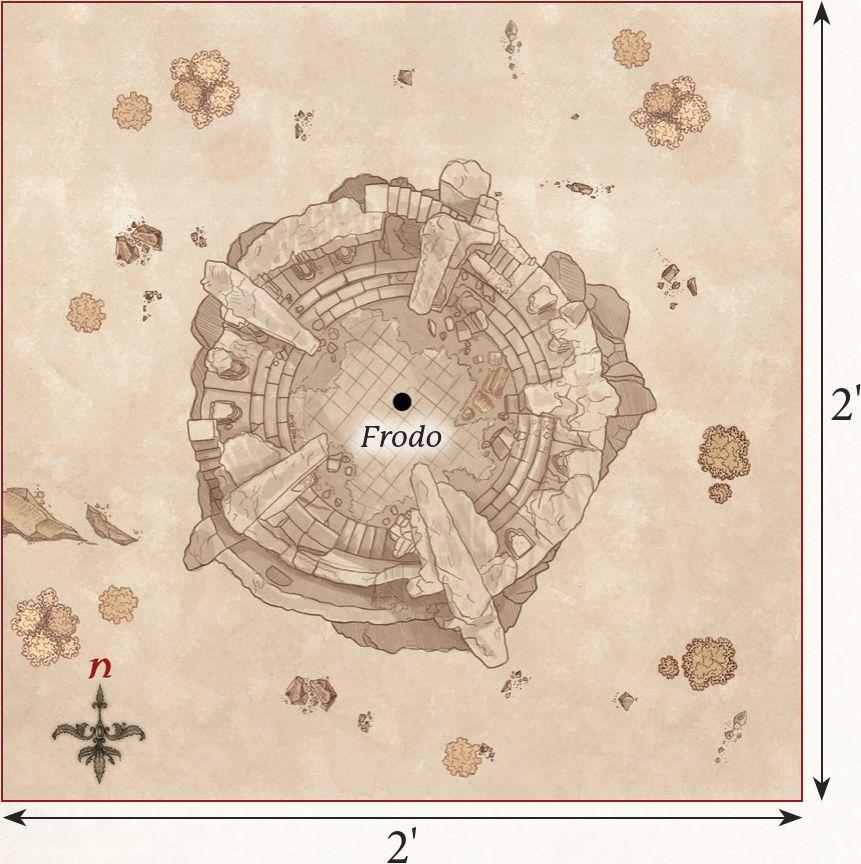
The board represents the ruined watchtower of Amon Sûl, which has a diameter of 12" and should occupy the centre of the board. The rest of the board can have the odd pile of rubble, trees and hedges dotted around.
STARTING POSITIONS
The Good player deploys Frodo in the centre of Weathertop and then deploys the other Hobbits in base contact with Frodo. The Evil player then deploys the Witch-king and the other Ringwraiths in base contact with the edge of Amon Sûl. Aragorn is kept aside for later in the game.
OBJECTIVES
The Nazgûl have come to claim the One Ring for their master; only by driving them off can Frodo and his companions hope to keep the Ring from their clutches.
The game lasts until one side has completed their objective. The Evil player wins immediately if Frodo is slain. The Good player wins if all Evil models are slain before this can happen.
SPECIAL RULES
- Flaming Brands
Aragorn, Sam, Merry and Pippin have flaming brands in this scenario in addition to their normal wargear. If a Ringwraith loses a Combat against a model with a flaming brand, then after Backing Away they will retreat D6" away from that model, in a direction chosen by their controlling player. Additionally, once per game, Aragorn may choose to use his flaming brand as a throwing weapon. If Aragorn hits with this flaming brand do not roll To Wound; instead the hit model is automatically Set Ablaze. Once Aragorn has thrown his flaming brand, remove it from his wargear.
- Aragorn
From turn 2 onwards, the Good player may roll a D6 at the end of each of their Activation Phases. On a 4+, Aragorn has arrived; place him in base contact with any edge of Amon Sûl. Aragorn may not Activate during the Activation Phase, but may otherwise act normally.
- Cry of the Nazgûl
Once per game, at the start of any Move Phase, the Evil player can declare they are unleashing the screech of the Nazgûl. If they do, then until the End Phase of the turn all Good models suffer an additional -3 to any Courage Tests they are required to take. If this is used before Aragorn has arrived, he will automatically arrive this turn.
BALIN'S TOMB
PARTICIPANTS
Good: Frodo Baggins with Sting and Mithril Coat; Samwise Gamgee; Meriadoc Brandybuck; Peregrin Took; Gandalf the Grey; Aragorn (Strider) with bow; Legolas Greenleaf; Gimli, son of Glóin; Boromir of Gondor with shield.
Evil: 2 Moria Goblin Captains; 24 Moria Goblin Warriors: 8 with shield, 8 with spear, 8 with Orc bow; 1 Cave Troll with hand-and-a-half weapon.
LAYOUT
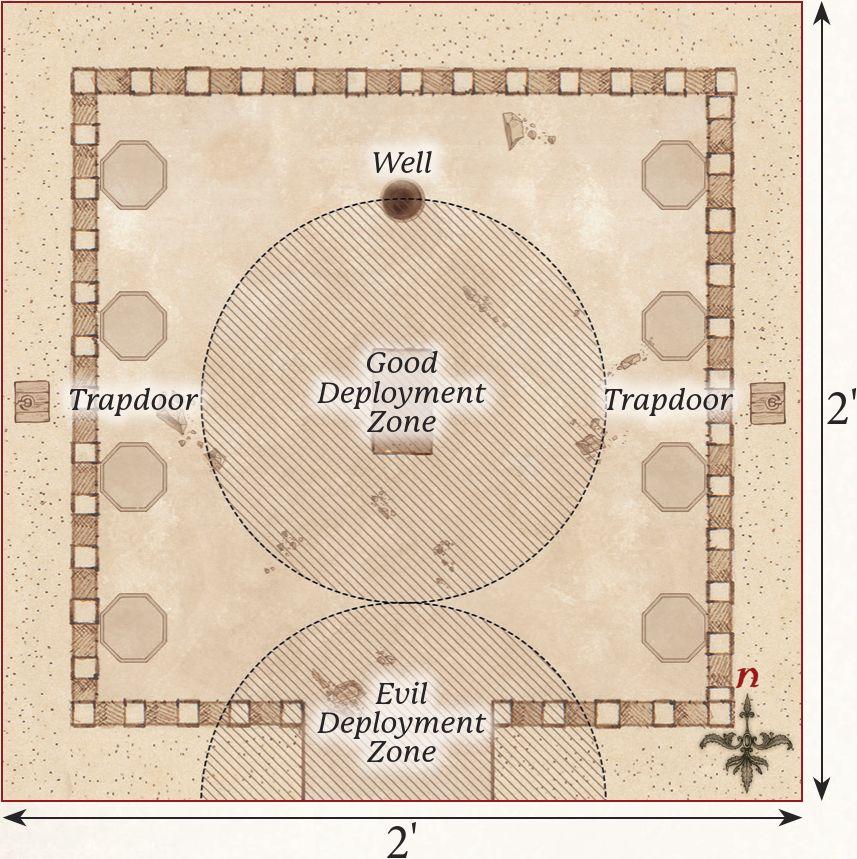
The board represents Balin's Tomb. In the centre of the southern board edge is the doorway to the tomb. There is a raised edge that runs all the way around the edge of the board that is 3" wide. In the centre of the board is the tomb itself, and the well is placed 6" from the centre of the northern board edge. A selection of pillars should be placed as shown on the map, as well as two trapdoors on the raised area in the centre of the eastern and western board edges.
STARTING POSITIONS
The Good player deploys the Fellowship wholly within 6" of the centre of the board. The Evil player then places the Goblins wholly within 6" of the doorway of the tomb, but not within the Control Zone of any Good models. The Cave Troll is kept aside for later in the game.
OBJECTIVES
The Fellowship have been ambushed and trapped by the Goblins, and must now fight them off to survive.
The game lasts for 10 turns. The Good player wins if at least five members of the Fellowship, including Frodo, are alive at the end of the game. The Evil player wins if five or more Good models are slain. Additionally, if Frodo is slain the Evil player automatically wins.
SPECIAL RULES
- The Goblin Tide
Whenever a Goblin Warrior is slain, keep it to one side. At the end of each of the Evil player's Activation Phases, each Goblin Warrior kept aside in this manner may re-enter the board from one of the entry points. Up to one Goblin may enter from each trapdoor (providing no Good model is stood upon it), up to two Goblin models may enter from the well, and any others may enter via the doorway. Any Goblin models that cannot enter the board may try again next turn. Goblin models that arrive in this manner may Activate as normal when they enter the board, and may Charge if they wish.
- "They have a Cave Troll!"
At the beginning of the Evil player's fourth Activation Phase, the Cave Troll may Move onto the board via the doorway, and may Activate and Charge as normal. During the turn it enters the board, the Cave Troll may Move 'through' friendly models. Any Goblin Moved through immediately suffers a Strength 3 hit, and any Goblin that the Cave Troll finishes its Move on is automatically slain.
- Troll Rampage
The Cave Troll gains a bonus of +1 to its Fight Value during a turn in which it Charges.
AMON HEN
PARTICIPANTS
Good: Frodo Baggins with Sting and Mithril Coat; Samwise Gamgee; Meriadoc Brandybuck; Peregrin Took; Aragorn (Strider) with bow; Legolas Greenleaf; Gimli, son of Glóin; Boromir of Gondor.
All Good models have an Elven cloak.
Evil: Lurtz, Uruk-hai Scout Captain; 1 Uruk-hai Scout Captain; 24 Uruk-hai Scouts: 8 with shield, 8 with Uruk-hai bow, 8 with no additional equipment.
LAYOUT
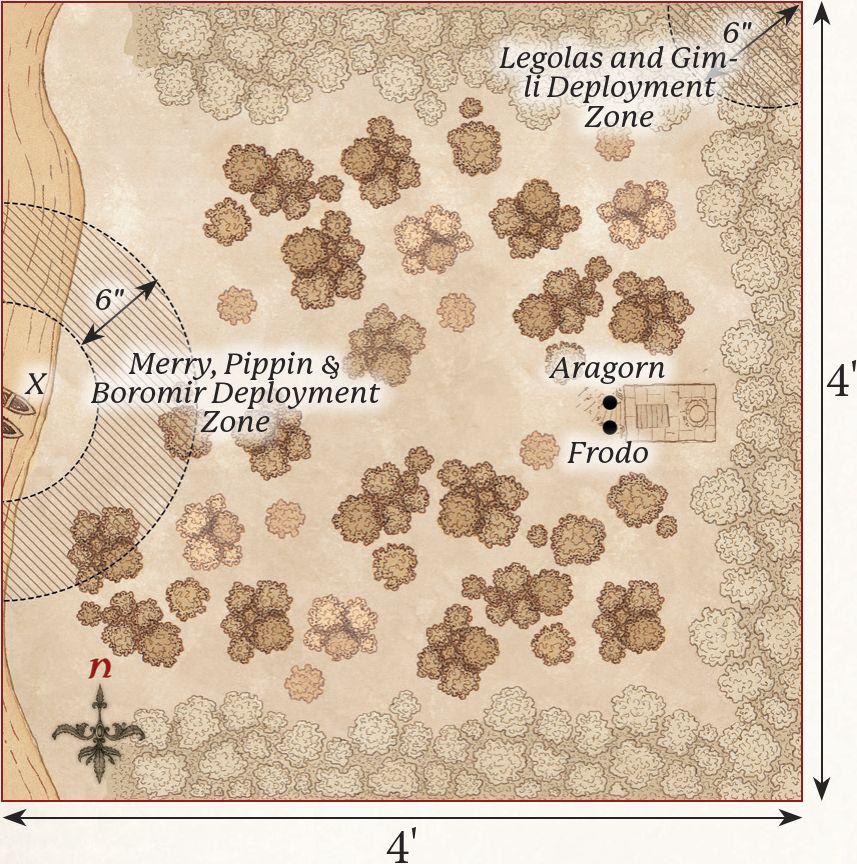
The board represents the area surrounding the Seeing Seat of Amon Hen. The board should be densely packed with trees and other foliage. The western board edge represents the River Anduin and should have two boats placed at the point marked X. The Seeing Seat should be placed in the eastern half of the board as per the map.
STARTING POSITIONS
The Good player deploys Aragorn and Frodo in base contact with the Seeing Seat, and then Legolas and Gimli anywhere wholly within 6" of the north-east corner of the board. Merry, Pippin and Boromir are then deployed wholly between 6" and 12" of the centre of the western board edge, and within 1" of each other.
The Evil player then deploys the Uruk-hai Scout Captain and 12 Uruk-hai Scouts wholly within 6" of the Seeing Seat, but not within 1" of a Good model. They then deploy Lurtz and the other 12 Uruk-hai Scouts wholly within 12" of Boromir, but no closer than 6".
Finally, Sam is deployed anywhere on the board at least 12" away from any other member of the Fellowship.
OBJECTIVES
Frodo has made his decision; he is going to leave the Fellowship and journey to Mordor alone. The Uruk-hai are under strict orders to deliver the Hobbits to Saruman alive and unspoiled.
The game lasts until Frodo leaves the board under any circumstance. The Good player wins if Frodo can escape the board by moving into base contact with the boats. The Evil player wins if Frodo is captured by the Uruk-hai. The Evil player can claim a draw even if Frodo escapes the board via the boats, so long as they have captured any two of the remaining Hobbits.
SPECIAL RULES
- "Find the Halflings!"
Should a Hobbit model suffer their final Wound, then instead of being slain they will recover a single Wound and be knocked out - treat them as under the effects of the Paralyse Magical Power. Evil models treat a knocked out Hobbit as a Heavy Object (see page 134 of the Middle-earth Strategy Battle Game Rules Manual). Should a Good model end its Activation in base contact with a knocked out Hobbit model, they will automatically revive them and the Hobbit model may act as normal from then on, though they will begin their Activation Prone. Should an Evil model leave the board whilst carrying a knocked out Hobbit, then that Hobbit is captured. Evil models may not leave the board via the River Anduin on the western board edge.
- The Legions of Isengard
At the start of each of the Evil player's Activation Phases, they may roll a D6 for each Evil Warrior that has previously been slain. On a 4+, that model may enter play anywhere along the northern, southern or eastern board edges via the rules for Reinforcements.
The Lord Of The Rings: The Two Towers
AMBUSH AT NIGHT
PARTICIPANTS
Good: Éomer, Marshal of the Riddermark with Firefoot; Meriadoc Brandybuck; Peregrin Took; 1 Captain of Rohan with shield and horse; 12 Riders of Rohan: 4 with throwing spears and 8 with no additional equipment.
Evil: Uglúk, Uruk-hai Scout Captain; Grishnákh, Orc Captain; Snaga, Orc Captain; 1 Uruk-hai Scout Captain; 12 Uruk-hai Scouts: 4 with shield, 4 with Uruk-hai bow, 4 with no additional equipment; 12 Isengard Orc Warriors: 4 with shield, 4 with spear, 2 with two-handed weapon, 2 with Orc bow.
LAYOUT
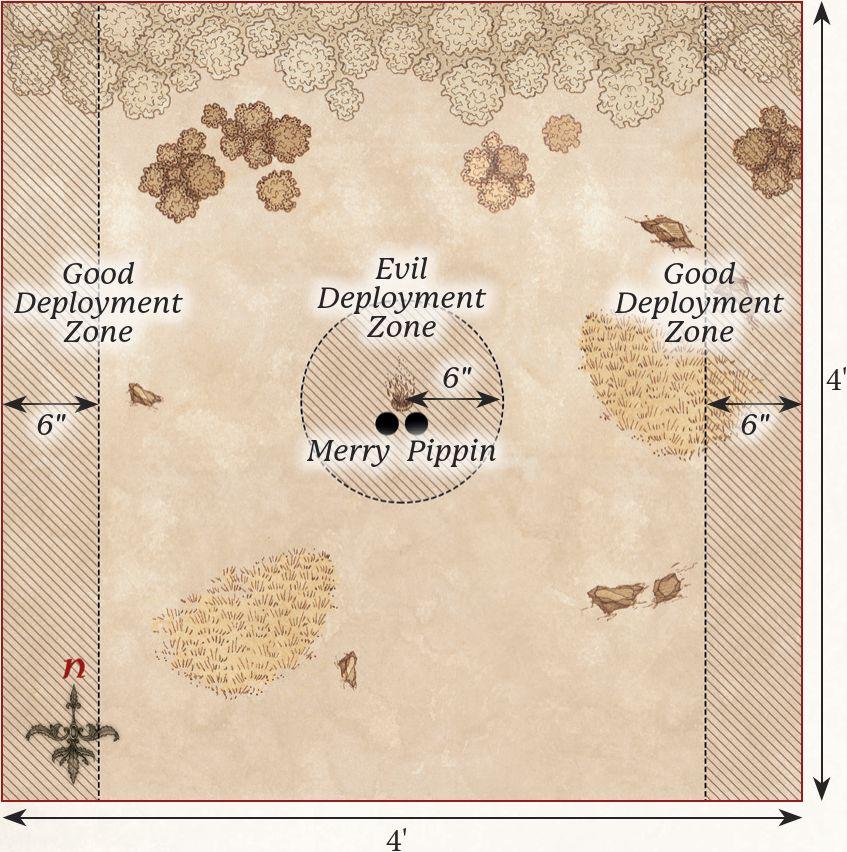
The board represents the plains by the edges of Fangorn Forest. The northern board edge is the boundary of the forest, and so should be lined with trees. In the centre of the board is a campfire. The rest of the board is grassland, with the odd bush or hedge dotted around.
STARTING POSITIONS
The Good player deploys Merry and Pippin as close to the centre of the board as possible, as shown on the map. The Evil player then deploys Grishnákh 3" away from the Hobbits towards the southern board edge, and then deploys the rest of their models anywhere wholly within 6" of the centre of the board. The Good player then deploys Éomer and half of their Riders of Rohan wholly within 6" of the western board edge, and the Captain of Rohan and the remaining Riders of Rohan wholly within 6" of the eastern board edge.
OBJECTIVES
The Rohirrim have caught the Uruk-hai off-guard and are intent on ridding their lands of these invaders. Yet even as the Rohirrim and Uruk-hai skirmish with each other, Merry and Pippin are trying to escape, making for the safety of Fangorn.
The game lasts until the end of a turn in which one side has been reduced to 25% of its starting numbers, and both Hobbits are no longer on the board. The Good side wins if the Evil army is reduced to 25%. The Evil side wins if the Good army is reduced to 25%. If both armies are reduced to 25% in the same turn, the game is a draw. If either Merry or Pippin are slain, the best result the Good player can achieve is a draw.
SPECIAL RULES
- Surprise Attack
Evil models may not Move during the first turn of the game.
- Merry and Pippin
Merry and Pippin begin the game Prone and bound. Whilst bound, the Hobbits may only Move by crawling and may not Charge. Enemy models may not Charge Merry or Pippin - they have far bigger problems to worry about after all! Merry and Pippin do not have a Control Zone and may ignore enemy Control Zones and may Move through enemy models without penalty; though they may not finish their Move overlapping an enemy model's base. Enemy models may Move through Merry and Pippin in the same way - we assume they walk over the Hobbits or push them out of the way.
- "Their bonds were cut"
At the end of each of Merry and Pippin's Activations, they may roll a D6. On the roll of a 6, they successfully cut their bonds and are no longer Prone. If when one of the Hobbits makes this roll they are in base contact with the other Hobbit, who is not bound themselves, they receive a bonus of +1 to this roll.
- Grishnákh
Grishnákh follows the same rules for Movement as the Hobbits, except that he crawls 3" and cannot cut his bonds as he is not bound. Grishnákh is the only model that can Charge the Hobbits, and he will fight them in the Fight Phase if he does so. If Grishnákh is fighting one of the Hobbits, both models will fight as normal even though they are both Prone; ignoring the rules for being Prone. Additionally, as he is wounded, Grishnákh begins the game with only a single point of Might, Will and Fate, and only has 1 Attack.
LAST MARCH OF THE ENTS
PARTICIPANTS
Good: Treebeard with Merry & Pippin; Birchseed; Beechbone; 3 Ents.
Evil: 4 Isengard Orc Captains; 48 Isengard Orc Warriors: 16 with shield, 16 with spear, 8 with two-handed weapon, 8 with Orc bow.
LAYOUT
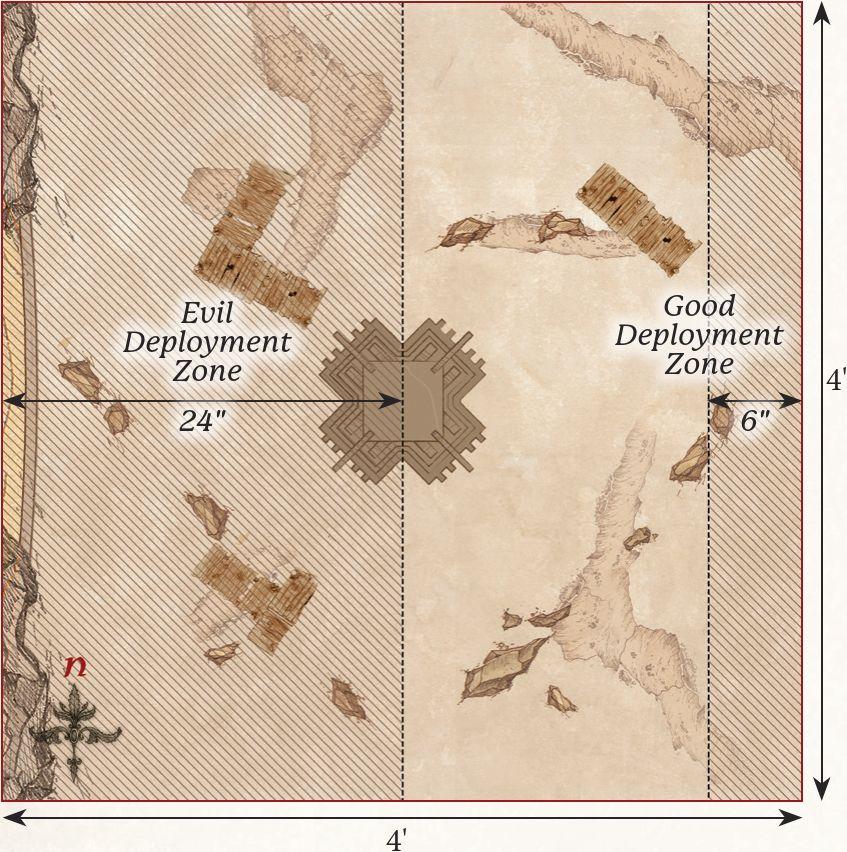
The board represents the area around the Tower of Orthanc, which stands in the centre of the board. The rest of the board should be dotted with a variety of scaffolding and pits to represent the industrial heart of Isengard. In the centre of the western board edge should be the dam holding back the River Isen.
STARTING POSITIONS
The Good player deploys their models wholly within 6" of the eastern board edge. The Evil player then deploys their models wholly within the western board half, or atop any piece of scaffolding on the board.
OBJECTIVES
The Ents can only wash away the filth of Saruman from Isengard by breaking the dam and releasing the River Isen. Should they fail to accomplish their task, the legions of the White Hand will become a force to be reckoned with in Middle-earth.
The game lasts until one side has completed their objective. The Good player wins if the dam is destroyed. The Evil player wins if all Good models are slain.
SPECIAL RULES
- Flaming Arrows
If an Orc makes a shooting attack against an Ent and scores a natural 6 To Hit, and then subsequently Wounds their target, then the Ent will suffer 2 Wounds rather than 1 and will immediately become Set Ablaze.
- "Bring them down!"
If an Ent loses a Combat against at least 3 Evil models, then the Evil player may choose to have the Orcs try and bring down the Ent instead of making Strikes. If they do, then no Strikes are made against the Ent. Instead, the Evil player rolls a D6 for each of their models that was Engaged in Combat with the Ent. If any natural 6's are rolled, then the Ent is immediately knocked Prone.
- "Release the River!"
The dam has a Defence of 10 and 5 Wounds, and can only be harmed in Combat.
SIEGE OF HELM'S DEEP
PARTICIPANTS
GOOD:
Defenders of the Hornburg: Théoden, King of Rohan with heavy armour and shield; Gamling, Captain of Rohan with Royal Standard of Rohan; 25 Warriors of Rohan: 8 with shield, 8 with shield and throwing spears, 8 with bow, 1 with banner.
Defenders of the Deeping Wall: Aragorn (Strider) with armour; Legolas Greenleaf with armour; Gimli, son of Glóin; Haldir, Galadhrim Captain with heavy armour and Elf bow; Haleth, Son of Háma; Aldor, Rohan Archer; 25 Warriors of Rohan: 8 with shield, 8 with shield and throwing spears, 8 with bow, 1 with banner; 25 Galadhrim Warriors: 8 with shield, 8 with shield and Elven spear, 8 with Elf bow, 1 with banner.
Relief Force: Éomer, Marshal of the Riddermark on Firefoot with armour; Gandalf the White on Shadowfax; 1 Captain of Rohan with shield on horse; 24 Riders of Rohan: 8 with throwing spears, 16 with no additional equipment.
EVIL:
Legions of Isengard: 5 Uruk-hai Captains; 1 Isengard Assault Ballista; 5 Uruk-hai Demolition Teams; 85 Uruk-hai Warriors: 35 with shield, 35 with pike, 12 with crossbow, 3 with banner; 16 Uruk-hai Berserkers; 10 Siege Ladders.
LAYOUT
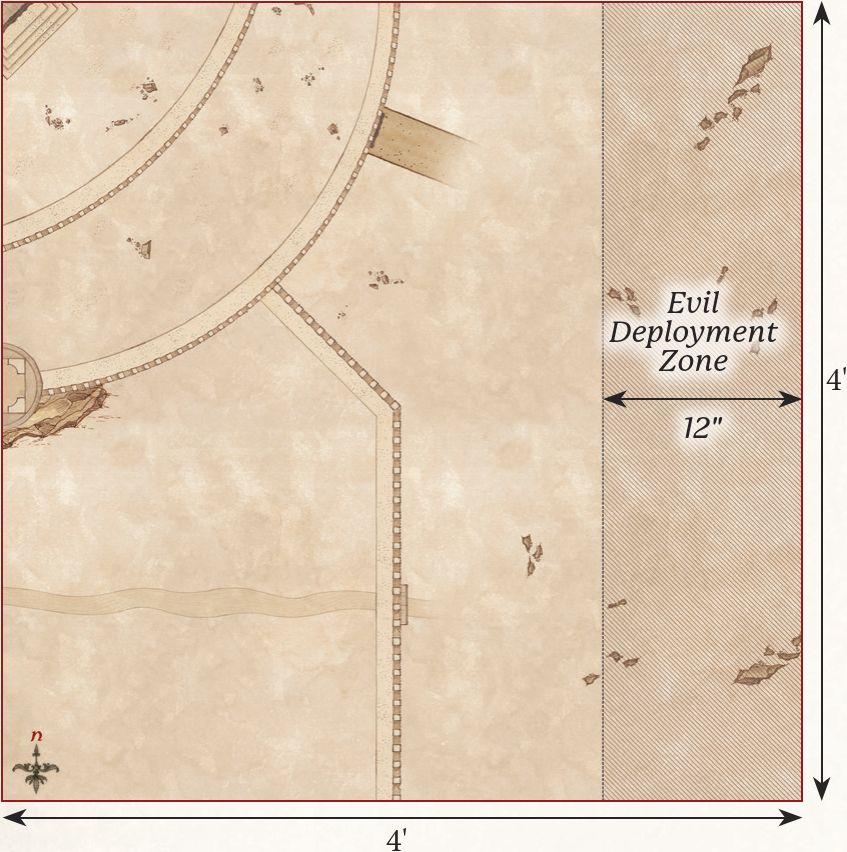
The board represents the fortress of Helm's Deep and the lands outside it. The Hornburg is situated in the 2'×2' area in the north-west corner of the board, with the causeway extending out onto the battlefield from it. The Deeping Wall runs from the Hornburg to the centre of the Southern board edge, and should be around 24" away from the western board edge at all times (see map). In the centre of the Deeping Wall is the culvert, and the area of the Deeping Wall within 6" of the culvert should be removable. The rest of the board should be clear to allow plenty of space for the Uruk-hai to make their way to the fortress walls.
STARTING POSITIONS
The Good player deploys the Defenders of the Deeping Wall anywhere on the Deeping Wall. They then deploy the Defenders of the Hornburg anywhere wholly within the Hornburg. The Relief Force is kept aside for later. The Evil player then deploys the Legions of Isengard anywhere wholly within 12" of the eastern board edge.
OBJECTIVES
The Siege of Helm's Deep is a huge battle fought across the entire fortress; as such this scenario has seven objectives for both sides to fight over. As this scenario will take a long time, we suggest you gather your friends and decide amongst yourselves how long to play for (we recommend at least five hours - possibly the whole weekend!) and whichever team has achieved the most objectives by the time the game ends is declared the winner!
-
Théoden - If Théoden is alive at the end of the game, Good claims this objective. If Théoden has been slain, then Evil claims this objective.
-
The Deeping Wall - If the Deeping Wall is not destroyed at the end of the game, Good claims this objective. If the Deeping Wall is destroyed, Evil claims this objective.
-
The Hornburg - Whichever side has the most models wholly within the Hornburg at the end of the game claims this objective.
-
The Causeway - Whichever side has the most models wholly on the Causeway at the end of the game claims this objective.
-
The Heroes of Helm's Deep - There are eight Good Hero models within Helm's Deep - Aragorn, Legolas, Gimli, Théoden, Gamling, Haldir, Haleth and Aldor. If more of these models are alive than dead at the end of the game, Good claims this objective. If more of these models are dead than alive at the end of the game, Evil claims this objective.
-
Éomer - If Éomer is alive at the end of the game, Good claims this objective. If Éomer has been slain, then Evil claims this objective.
-
Uruk-hai Commanders - If at least 3 of the Uruk-hai Captains have been slain, Good claims this objective. If at least 3 Uruk-hai Captains are alive at the end of the game, Evil claims this objective.
SPECIAL RULES
- Ride Out
At the start of the 8th turn, and any turn that follows, any Good Hero within 6" of the gates of the Hornburg that could be mounted on a horse (or a named horse if relevant) may immediately gain a Mount.
- The Deeping Wall
If a Demolition Charge is successfully detonated whilst within 3" of the culvert of Helm's Deep, the removable section of the Deeping Wall is removed from play. Any model on that part of the wall immediately suffers a Strength 9 hit and will suffer falling damage as described in the Middle-earth Strategy Battle Game Rules Manual.
- "Look to my coming"
At the end of the Good side's 10th Activation Phase, the Relief Force will enter the board from the southern board edge on the eastern half of the board. When they enter they will follow the rules for Reinforcements, with the exception that they may Charge on the turn in which they arrive.
- A Great Siege
This scenario follows all of the rules for Sieges, including siege equipment, as found in the Middle-earth Strategy Battle Game Rules Manual.
The Lord Of The Rings: The Return Of The King
ESCAPE FROM OSGILIATH
PARTICIPANTS
Good: Faramir, Captain of Gondor; Madril, Captain of Ithilien; Damrod, Ranger of Ithilien; 12 Warriors of Minas Tirith: 4 with shield, 4 with shield and spear, 4 with bow; 12 Rangers of Gondor: 4 with spear, 8 with no additional equipment.
Evil: Gothmog, Lieutenant of Sauron; Gothmog's Enforcer; Guritz, Master of Reserves; 24 Morannon Orc Warriors: 6 with shield, 6 with spear, 6 with shield and spear, 6 with no additional equipment; 1 Mordor Troll.
LAYOUT
The board represents the ruined city of Osgiliath, and as such should be covered in ruins, buildings, statues and piles of rubble of all shapes and sizes. The board should have a variety of walkways of different sizes. Some could represent the major roads through the city and would be big enough for whole warbands to fight side-by-side upon. Others will be narrow alleyways that separate the buildings and may fit one or two models through them.
STARTING POSITIONS
The Good player deploys their models anywhere wholly within 6" of the centre of the board. The Evil player then deploys Gothmog, Gothmog's Enforcer, and half of the Morannon Orcs anywhere wholly within 12" of the eastern board edge. The Evil player then deploys their remaining models anywhere wholly within 12" of the western board edge.
OBJECTIVES
The forces of Gondor must escape Osgiliath if they are to survive the Orc onslaught. Gothmog has commanded his forces to slaughter any who defend Osgiliath, and claim the ruined city for Mordor.
The game lasts until the end of a turn in which there are no Good models left on the board. The Good side wins if at least 33% of their models (9 models) can escape the board via the western board edge. The Evil player wins if they can prevent this.
SPECIAL RULES
- Faramir
If Faramir manages to escape the board via the western board edge, the best result the Evil player can achieve is a draw. If Faramir is slain, the best result the Good player can achieve is a draw.
- Hordes Without End
At the start of each of the Evil player's Activation Phases, they may roll a D6 for each Evil Warrior, with the exception of the Mordor Troll, that has previously been slain. On a 4+, that model may enter play from either of the points marked on the map via the rules for Reinforcements.
- "Nazgûl!"
At the start of each Move Phase, the Evil player may select a single Good Warrior and roll a D6. On a 3+ the chosen Warrior becomes paralysed by fear and may not Activate this turn. Additionally, they may still fight if Engaged in Combat, however, their Fight Value will be reduced to 1 for the duration of the turn.
BATTLE OF PELENNOR FIELDS
PARTICIPANTS
GOOD:
Gondor: Gandalf the White with Shadowfax and Pippin; Irolas, Captain of the Guard; 24 Warriors of Minas Tirith: 8 with shield, 8 with shield and spear, 8 with bow; 6 Citadel Guard: 3 with spear, 3 with longbow.
Rohan: Théoden, King of Rohan with heavy armour, shield and Snowmane with armour; Éomer, Marshal of the Riddermark with throwing spears and Firefoot with armour; Éowyn, Shieldmaiden of Rohan with armour, shield, horse and Merry; Gamling, Captain of Rohan with Royal Standard of Rohan and horse; 24 Riders of Rohan: 8 with throwing spears, 16 with no additional equipment.
Dead of Dunharrow: Aragorn (Strider) with Andúril, Flame of the West and Elven cloak; Legolas Greenleaf with armour and Elven cloak; Gimli, son of Glóin with Elven cloak; King of the Dead; 2 Heralds of the Dead; 20 Warriors of the Dead: 10 with shield, 10 with spear.
EVIL:
Mordor: The Witch-king of Angmar (3 Attacks, 3 Might, 18 Will, 3 Fate) with Crown of Morgul and armoured Fell Beast; Gothmog, Lieutenant of Sauron with Warg; Gothmog's Enforcer; Guritz, Master of Reserves; the Mûmak War Leader (with 12 crew); 1 Haradrim Chieftain with bow; 1 Easterling Captain; 48 Morannon Orc Warriors: 12 with shield, 12 with spear, 12 with shield and spear, 12 with no additional equipment; 2 Mordor Trolls; 2 War Mûmaks of Harad (each with 12 crew), 12 Haradrim Warriors: 6 with spear, 6 with bow: 10 Easterling Warriors: 4 with shield, 2 with Easterling halberd and shield, 4 with bow.
LAYOUT
The board represents the fields of Pelennor outside the walls of Minas Tirith. Along the northern board edge are the walls of Minas Tirith, with the Gatehouse in the centre. The rest of the board should be barren, befitting of the Pelennor and providing plenty of space for the huge number of models that take part in the battle.
STARTING POSITIONS
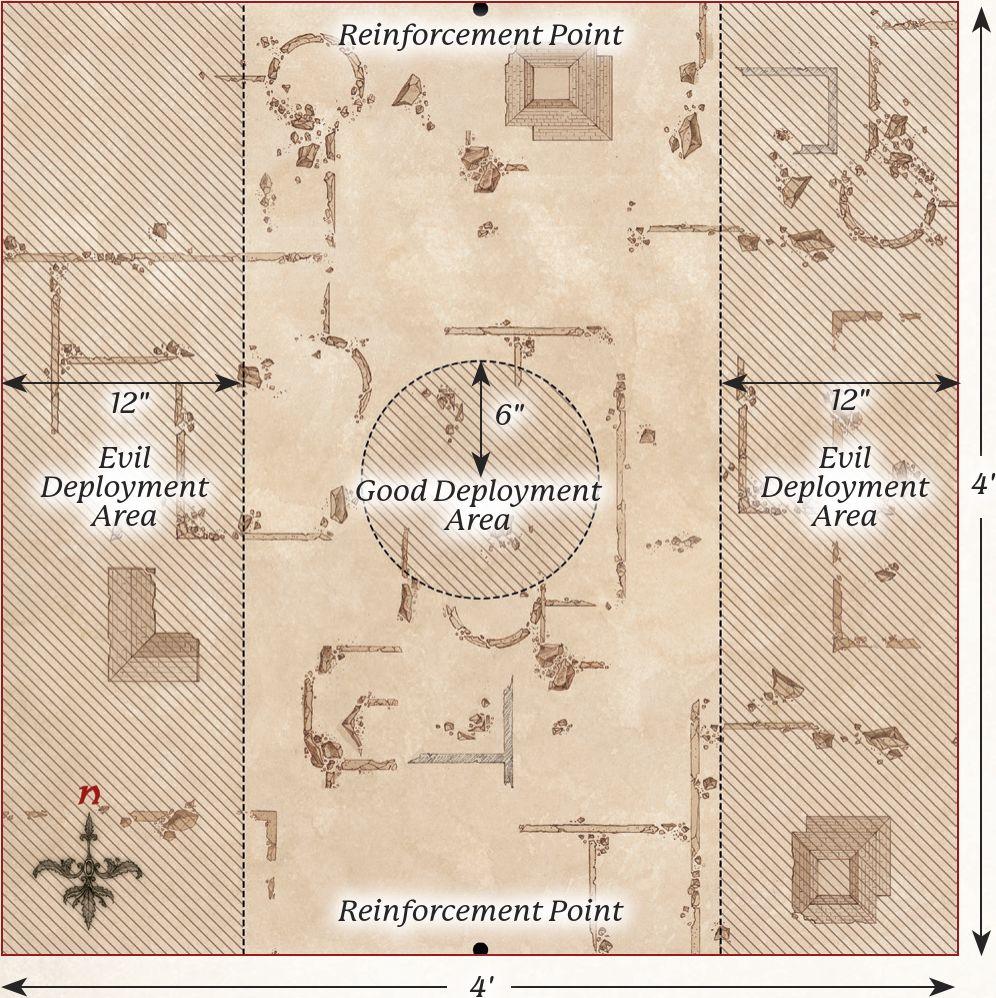
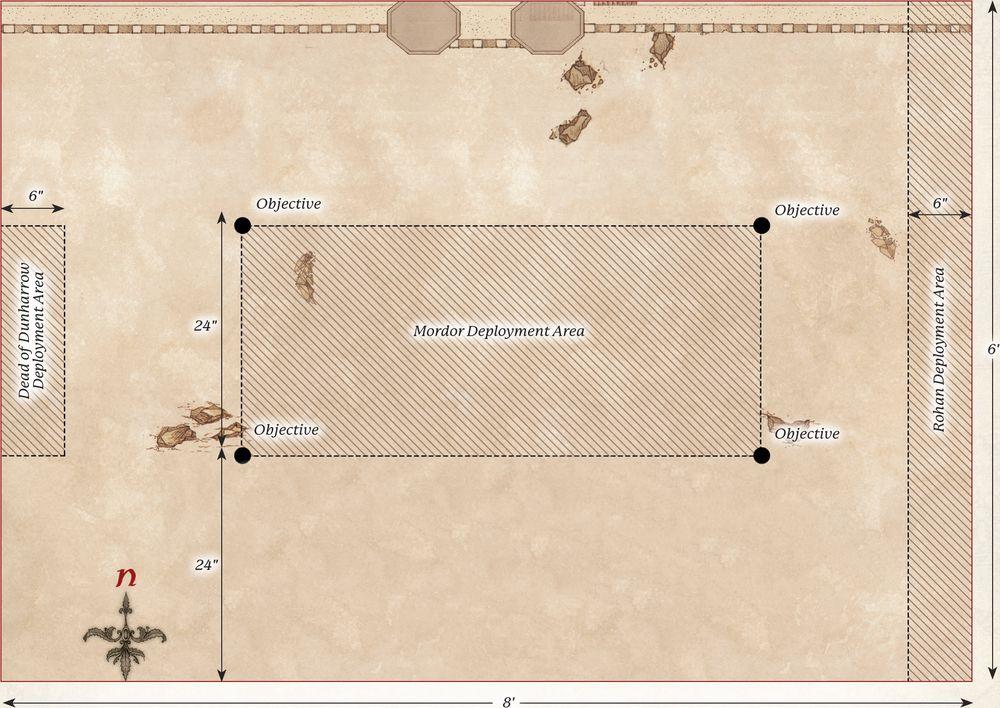
The Evil player deploys the Mordor force (with the exception of the Witch-king and the three Mûmakil) anywhere between 24" and 48" from the northern board edge, and at least 24" from the eastern and western board edges (see map). The Good player then deploys the Rohan force anywhere wholly within 6" of the eastern board edge (see map). The Good player then deploys the Dead of Dunharrow force anywhere wholly within 6" of the western board edge, but at least 24" away from the northern and southern board edges (see map). All other models are kept aside for later in the game.
OBJECTIVES
The Battle of Pelennor Fields is the greatest battle of the Third Age, and has many objectives. There are a total of five objectives for this Scenario, as listed below. As this Scenario will take a long time to play, we suggest that you gather your friends together and decide amongst you how long you wish to play for - either in time, or number of turns. When the game ends, whichever side has completed the most objectives is the winner.
- Heroes of the West - There are seven key Good Hero models upon the battlefield: Aragorn, Legolas, Gimli, Gandalf, Théoden, Éomer and Éowyn. If at the end of the game, more of these Hero models are alive than dead, Good claims this objective. If at the end of the game, more of these Hero models are dead than alive, Evil claims this objective.
- Servants of the Dark Lord - There are seven key Evil Hero models upon the battlefield: The Witch-king, Gothmog, Guritz, Gothmog's Enforcer, the Mûmak War Leader, the Harad Chieftain and the Easterling Captain. If at the end of the game, more of these Hero models are alive than dead, Evil claims this objective. If at the end of the game, more of these Hero models are dead than alive, Good claims this objective.
- The Mûmakil - There are three Mûmakil on the battlefield. If all the Mûmakil are slain, Good claims this objective. If there is at least 1 Mûmak left alive, Evil claims this objective.
- Gates of Minas Tirith - At the end of the game, whichever side has the most models within 12" of the Gates of Minas Tirith claims this objective.
- The Pelennor - There are four Objective Markers on the battlefield placed around the edge of the Evil deployment zone (see map). At the end of the game, whichever side controls the most Objective Markers claims this objective. An Objective Marker is considered to be controlled by whichever side has the most models within 3" of it.
SPECIAL RULES
- Charge of the Rohirrim
Any Rohan model that Charged during the Move Phase may declare a free Heroic Combat in the ensuing Fight Phase. This may be done by both Hero and Warrior models.
- War Beasts of Harad
At the end of the Evil player's second Activation Phase, the Mûmakil will Move onto the battlefield via the southern board edge.
- The Witch-king
At the end of the Evil player's fourth Activation Phase, the Witch-king will Move onto the battlefield via the northern board edge.
- Defend the White City
At the end of the Good player's sixth Activation Phase, the Gondor force will Move onto the battlefield via the Gates of Minas Tirith.
THE END OF ALL THINGS
PARTICIPANTS
Good: Frodo Baggins; Samwise Gamgee with Sting; Aragorn, King Elessar; Gandalf the White; Legolas Greenleaf; Gimli, son of Glóin; Meriadoc Brandybuck, Esquire of Rohan with shield; Peregrin Took, Guard of the Citadel; Éomer, Marshal of the Riddermark; 25 Warriors of Minas Tirith: 8 with shield, 8 with shield and spear, 8 with bow and 1 with banner; 25 Warriors of Rohan: 8 with shield, 8 with shield and throwing spears, 8 with bow and 1 with banner.
Evil: 1 Mordor Troll Chieftain; The Mouth of Sauron on armoured horse; Gollum; 3 Morannon Orc Captains with shield; 50 Morannon Orc Warriors: 12 with shield, 12 with spear, 12 with shield and spear, 12 with no additional wargear and 2 with banner.
LAYOUT
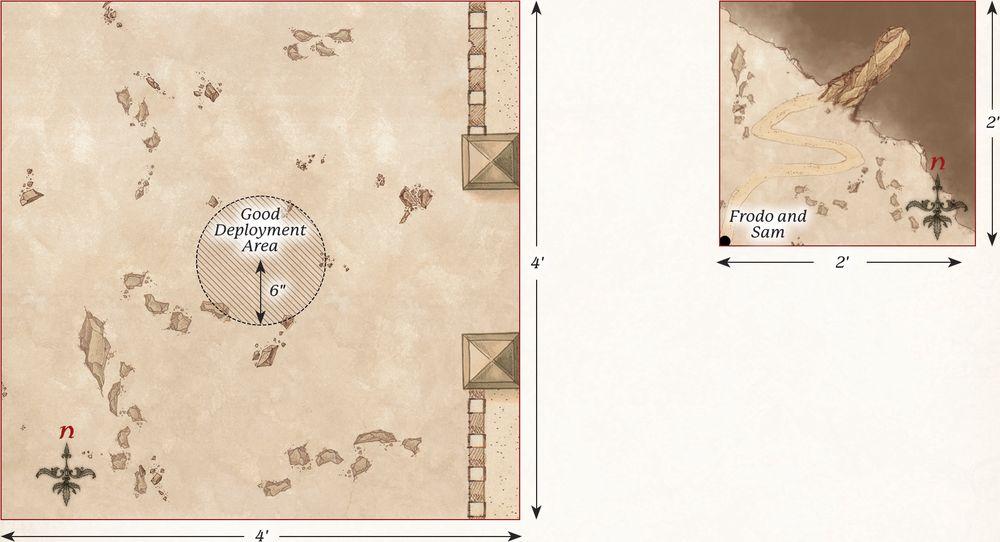
This scenario is unusual as it requires two separate playing areas; a 2'x2' one for the Crack of Doom and a 4'x4' one for the Black Gate. The Crack of Doom board should have half of the board representing the outside of Mount Doom with a pathway up to the door in the side of the mountain, which then leads to the walkway and the precipice above the lava (see map). The Black Gate board should have the Black Gate running along the eastern board edge whilst the rest of the board is relatively barren.
STARTING POSITIONS
The Good player deploys Frodo and Sam touching the southwest corner of the Crack of Doom board. They then deploy all the rest of their models wholly within 6" of the centre of the Black Gate board. The Evil player deploys all of their models (except Gollum) on the Black Gate board at least 6" away from any Good model.
OBJECTIVES
Frodo must destroy the Ring, and must do so quickly or his friends will perish.
The game lasts until either Frodo has destroyed the Ring, is taken over by the Ring or is slain. The Good player wins if the Ring is destroyed. The Evil player wins if Frodo is either slain or taken over by the Ring. Additionally, if all the Good Hero models at the Black Gate are slain, the best result the Good player can achieve is a draw.
SPECIAL RULES
- "Not here, not so close to the Eye!"
Frodo may not put the Ring on in this scenario.
- The Power of the Ring
At the start of each turn, before Priority is rolled, the Evil player may use one of the following powers to try and slow Frodo down and corrupt him. To use one of these powers the Evil player declares which power they wish to use and rolls a D6. If the score is equal to or higher than the score required, then they may use the power:
- Exhaustion (3+) - During the turn that this power is in effect, Frodo must take a Courage Test for each inch he wishes to move. If Frodo fails any of these Courage tests then he collapses and is immediately Prone. Sam may carry Frodo as a Heavy Object.
- Corruption (4+) - Frodo begins the game with 6 Resistant Points, which are unique to this Scenario. When this power is used, the Evil player rolls a D6 and compares it to the number of Resistant Points Frodo has remaining. If the result is equal to or higher than Frodo's current Resistant Points, then Frodo immediately loses 1 Resistant Point. If Frodo's Resistant Points are reduced to 0, then he has been taken over by the Ring and the game ends.
-
Lure of the Ring (5+) - The Ring provokes Gollum to attack, and he is placed in base contact with the Ringbearer. They will fight as normal during the Fight Phase before Gollum disappears back into hiding. If Gollum is ever slain, this power can no longer be used.
-
Destroying the Ring
To destroy the Ring, Frodo must be in base contact with the edge of the precipice over the lava. Frodo will then enter a battle of wills with Ring. Both players roll a D6 (re-rolling any ties) and compare results. If the Good player wins this roll three times in a row, the Ring is destroyed. If the Evil player wins this roll three times in a row, the Ring corrupts Frodo and the game ends. Frodo may use Might to influence these rolls.
- Gandalf's Staff
Gandalf does not have his Staff of Power, and therefore does not gain a free Will Point each turn.
- Teeming Hordes
Each time a Mordor Orc model is slain, keep it to one side. At the end of each Evil Activation Phase, the Evil player may Move any models kept aside in this manner onto the board from the Black Gate via the rules for Reinforcements.
- "Stand Your Ground!"
Good models may not willingly Move more than 12" away from the centre of the Black Gate board.
- Greatest of the Trolls
The Mordor Troll Chieftain gains the Fearless special rule and an additional point of Might, Will and Fate.